• home
    • recipes
    • travel
    • lifestyle
    • apple cider doughnuts
  • podcast
  • book
  • presets
Menu

MEGHAN RIENKS

Street Address
City, State, Zip
Phone Number

Your Custom Text Here

MEGHAN RIENKS

  • home
  • blog
    • recipes
    • travel
    • lifestyle
    • apple cider doughnuts
  • podcast
  • book
  • presets

Croquembouche

January 6, 2019 Meghan Rienks
IMG_1973.jpg IMG_1989.jpg IMG_2035.jpg IMG_2049.jpg IMG_2057.jpg

FOR THE Pâte à Choux

1 cup water

6 tablespoons unsalted butter (cut up)

1 tablespoon granulated sugar

½ teaspoon salt

1 cup flour

3-5 large eggs, room temp

(plus 1 egg & water for egg wash)


for the pastry cream

2 cups whole milk

4 tablespoons unsalted butter (cut up)

½ teaspoon kosher salt

2 vanilla beans, split lengthwise

5 large egg yolks

½ cup granulated sugar

¼ cup cornstarch

For the caramel

2 cups granulated sugar

½ cup water


IMG_1981.jpg
IMG_1987.jpg

for the pâte à Cchoux

  1. Prep a baking sheet with parchment paper & set aside

  2. Preheat oven to 425˚ F

  3. In a saucepan over medium - heat water, butter sugar & salt until the butter has melted.

  4. Once the butter has melted- quickly add all the flour & stir FAST AS HELL (with a wooden spoon)

  5. Continue to stir vigorously for about 3-4 minutes - or until you can see a film on the bottom of the pan & the dough comes together in one mass & pulls away from the sides of the pan.

  6. Transfer the dough to a medium bowl and let it cool for another 3-4 minutes.

  7. Mix one egg thoroughly in at a time (with the wooden spoon) -stir it in quickly making sure not to cook the egg. The mixture will break when you add each egg, but just continue to stir & it'll come back together.

    • the size of your eggs will determine how many of them your dough needs. You want the mixture to be smooth, glossy and sort of “stretchy” when you lift it from the spoon- NOT liquid-y or glue-like. So if you reach that perfect consistency with 3 eggs awesome! With 5? Awesome! That’s why we add one at a time :)

  8. In a pastry bag fitted with a round tip - fill with the dough.

  9. Pipe 1 inch (ish) rounds about 1 ½ inches apart on the prepared baking sheet.

  10. Dipping your finger in water- smooth out any points in the rounds (they’ll brown faster)

  11. In a small bowl whisk an egg with a bit of water (to make an egg wash) and brush over the top of each round of dough.

  12. Bake for 15 minutes - then turn then oven down to 350˚ F & bake for another 10-15 minutes (or until they’re golden brown, and when tapped on the bottom - sound hollow)

for the pastry cream:

  1. In a medium sauce pan (over medium heat) bring milk, butter, salt & vanilla pods to a simmer.

  2. In a separate medium bowl - beat egg yolks & granulated sugar together until pale & light in color. (use your electric whisk unless ur feeling extra Hulk-like today) Once the egg & sugar combo has been whisked until pale, add cornstarch and mix again until well combined.

  3. Taking the hot milk mixture off the heat, SLOWLY drizzle it into the egg mixture whisking constantly as to not cook the eggs.

  4. Once all added, pour the mixture through a sieve (to retrieve vanilla pods) then pour it back into the saucepan and cook again over medium heat, whisking constantly until it’s thick & you can see the whisk marks held in the cream.

  5. Strain the cream the sieve again and into a medium bowl - cover with plastic wrap (directly touching the custard as to not form a *shudders* …“skin”

  6. Chill until fully cooled - at least 2 hours.

  7. Fill pastry bag (fitted with a star tip) with the chilled cream.

for the caramel:

  1. Add sugar & water to a shallow pan & stir JUST to combine.

  2. DON’T TOUCH IT - continue to cook over medium heat for about 15-20 minutes, the sugar will go from a milky white, to a light amber color.

    • if you stir: it WILL crystalize & you WILL have to start over & you WILL hate yourself

  3. Remove from heat, it’ll get a tad bit darker from the residual heat of the pan & you don’t want it to go over & burn.
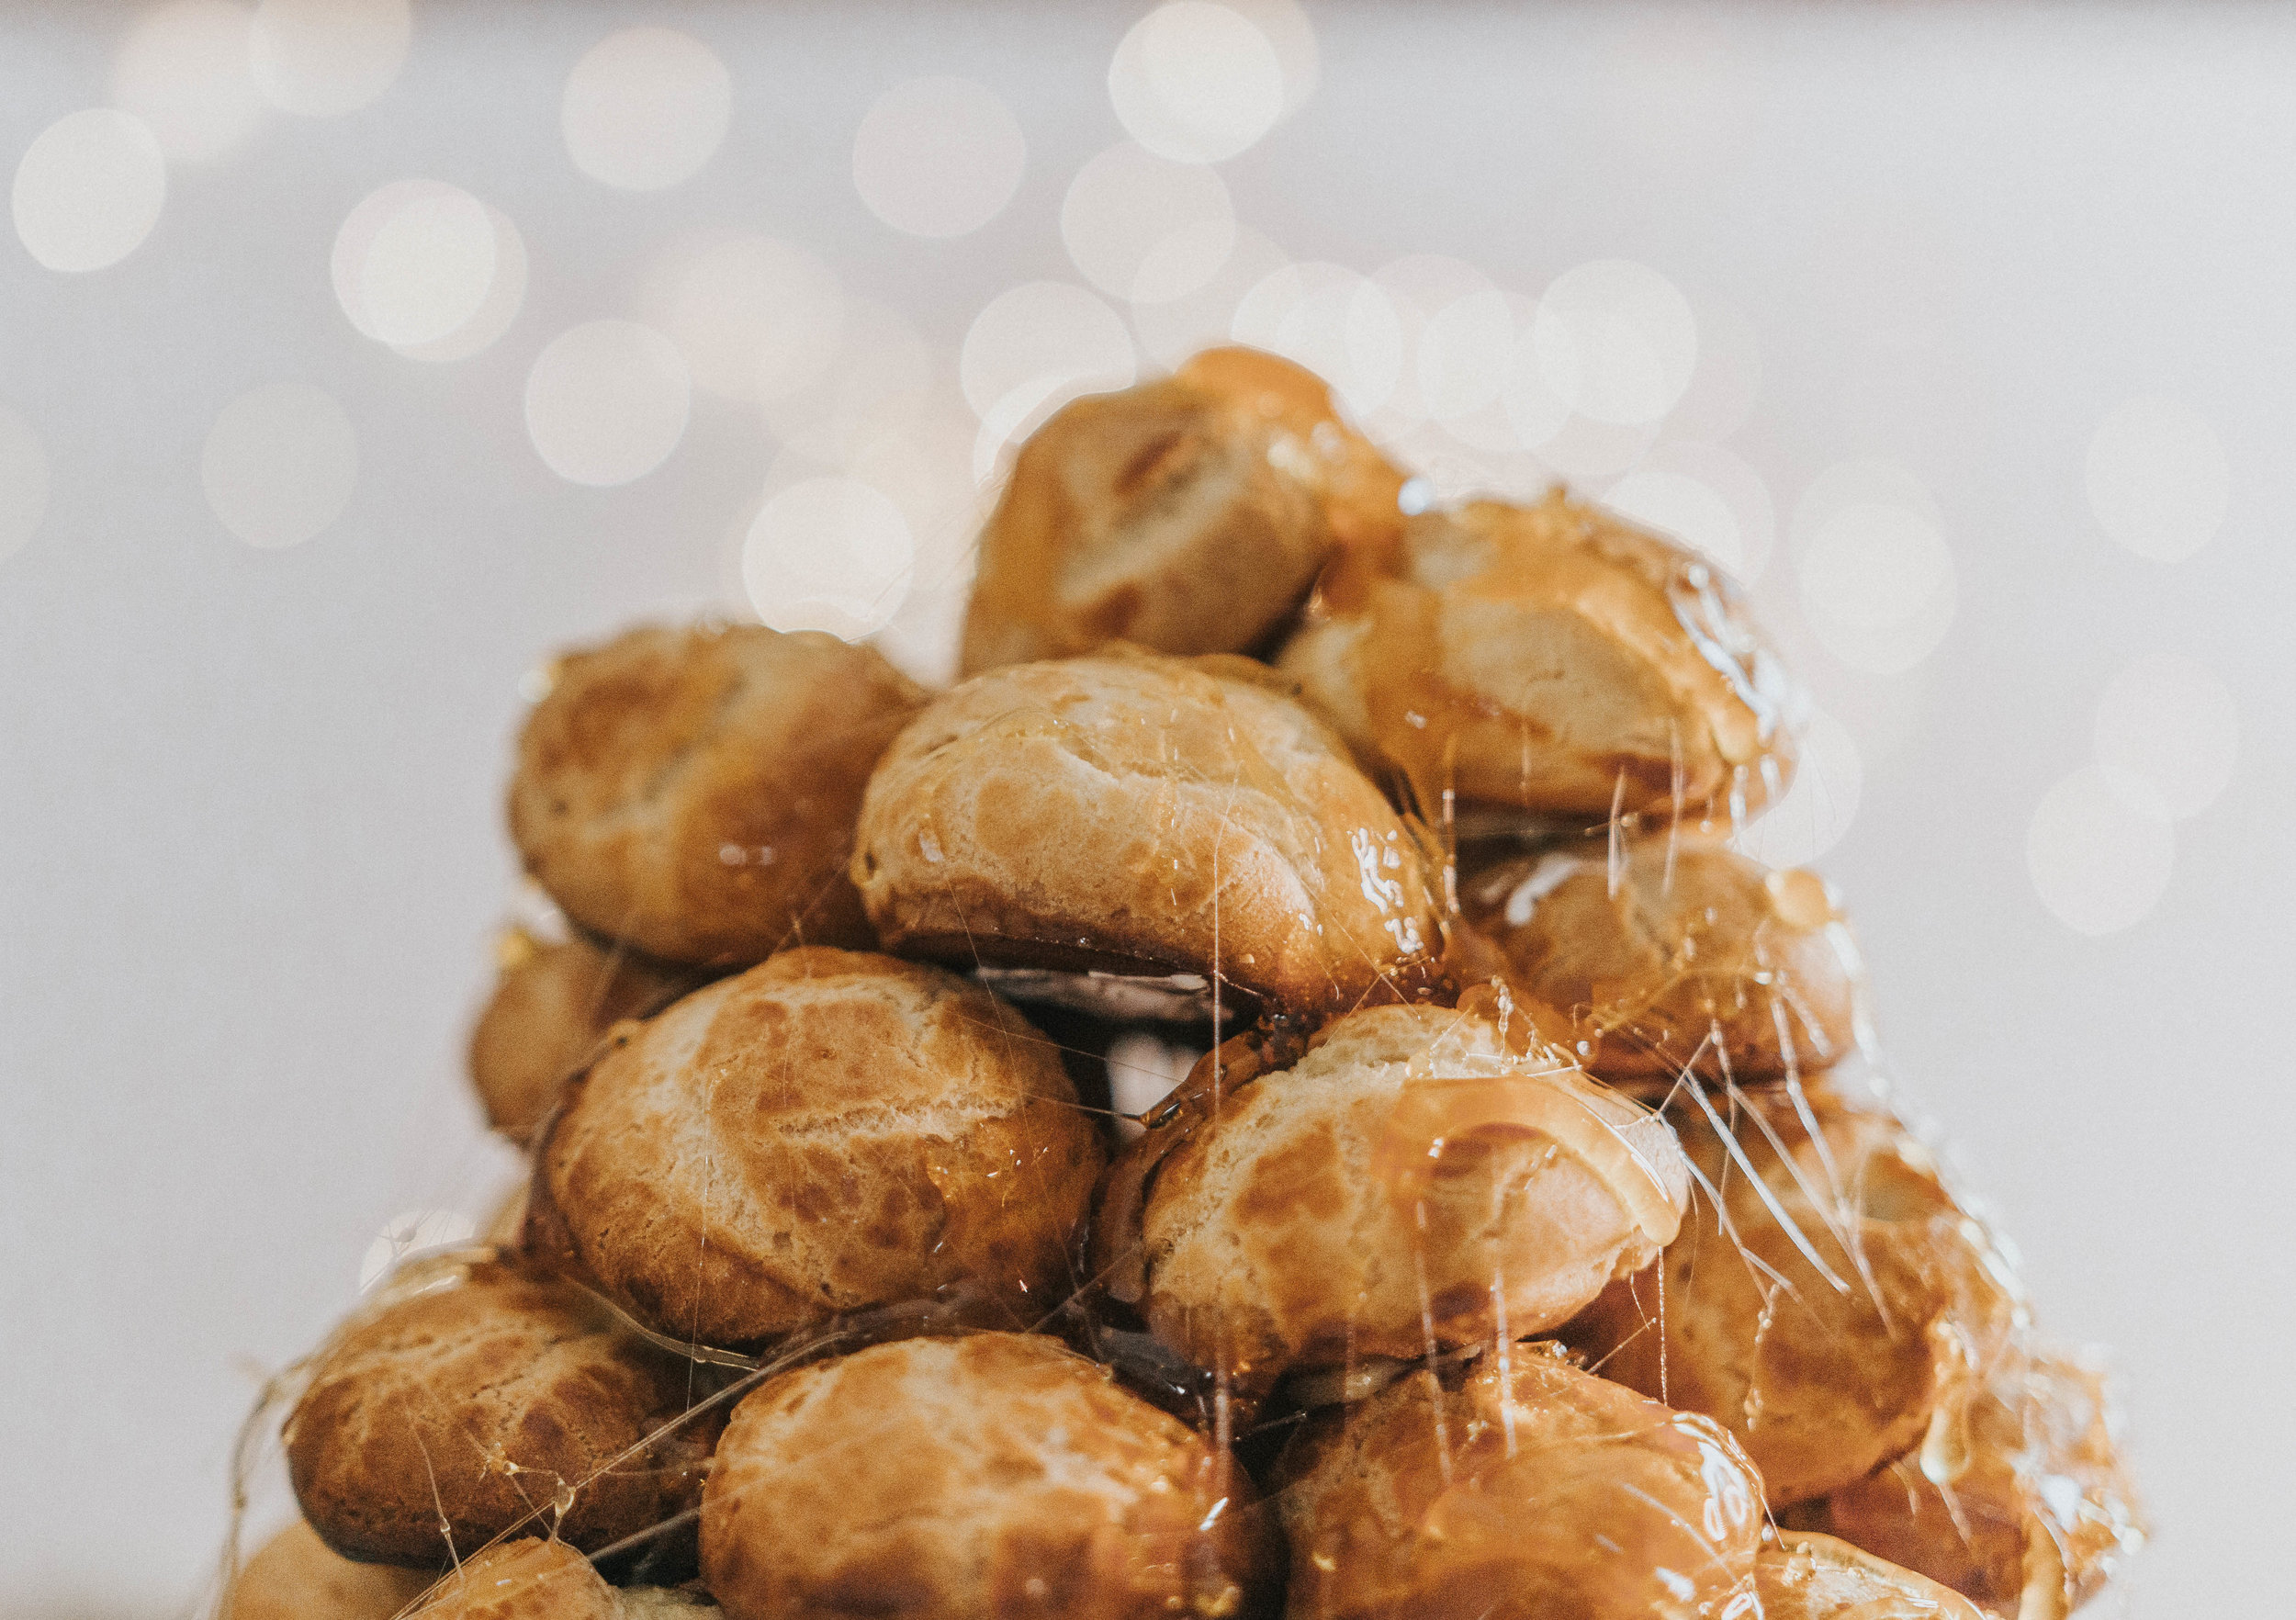
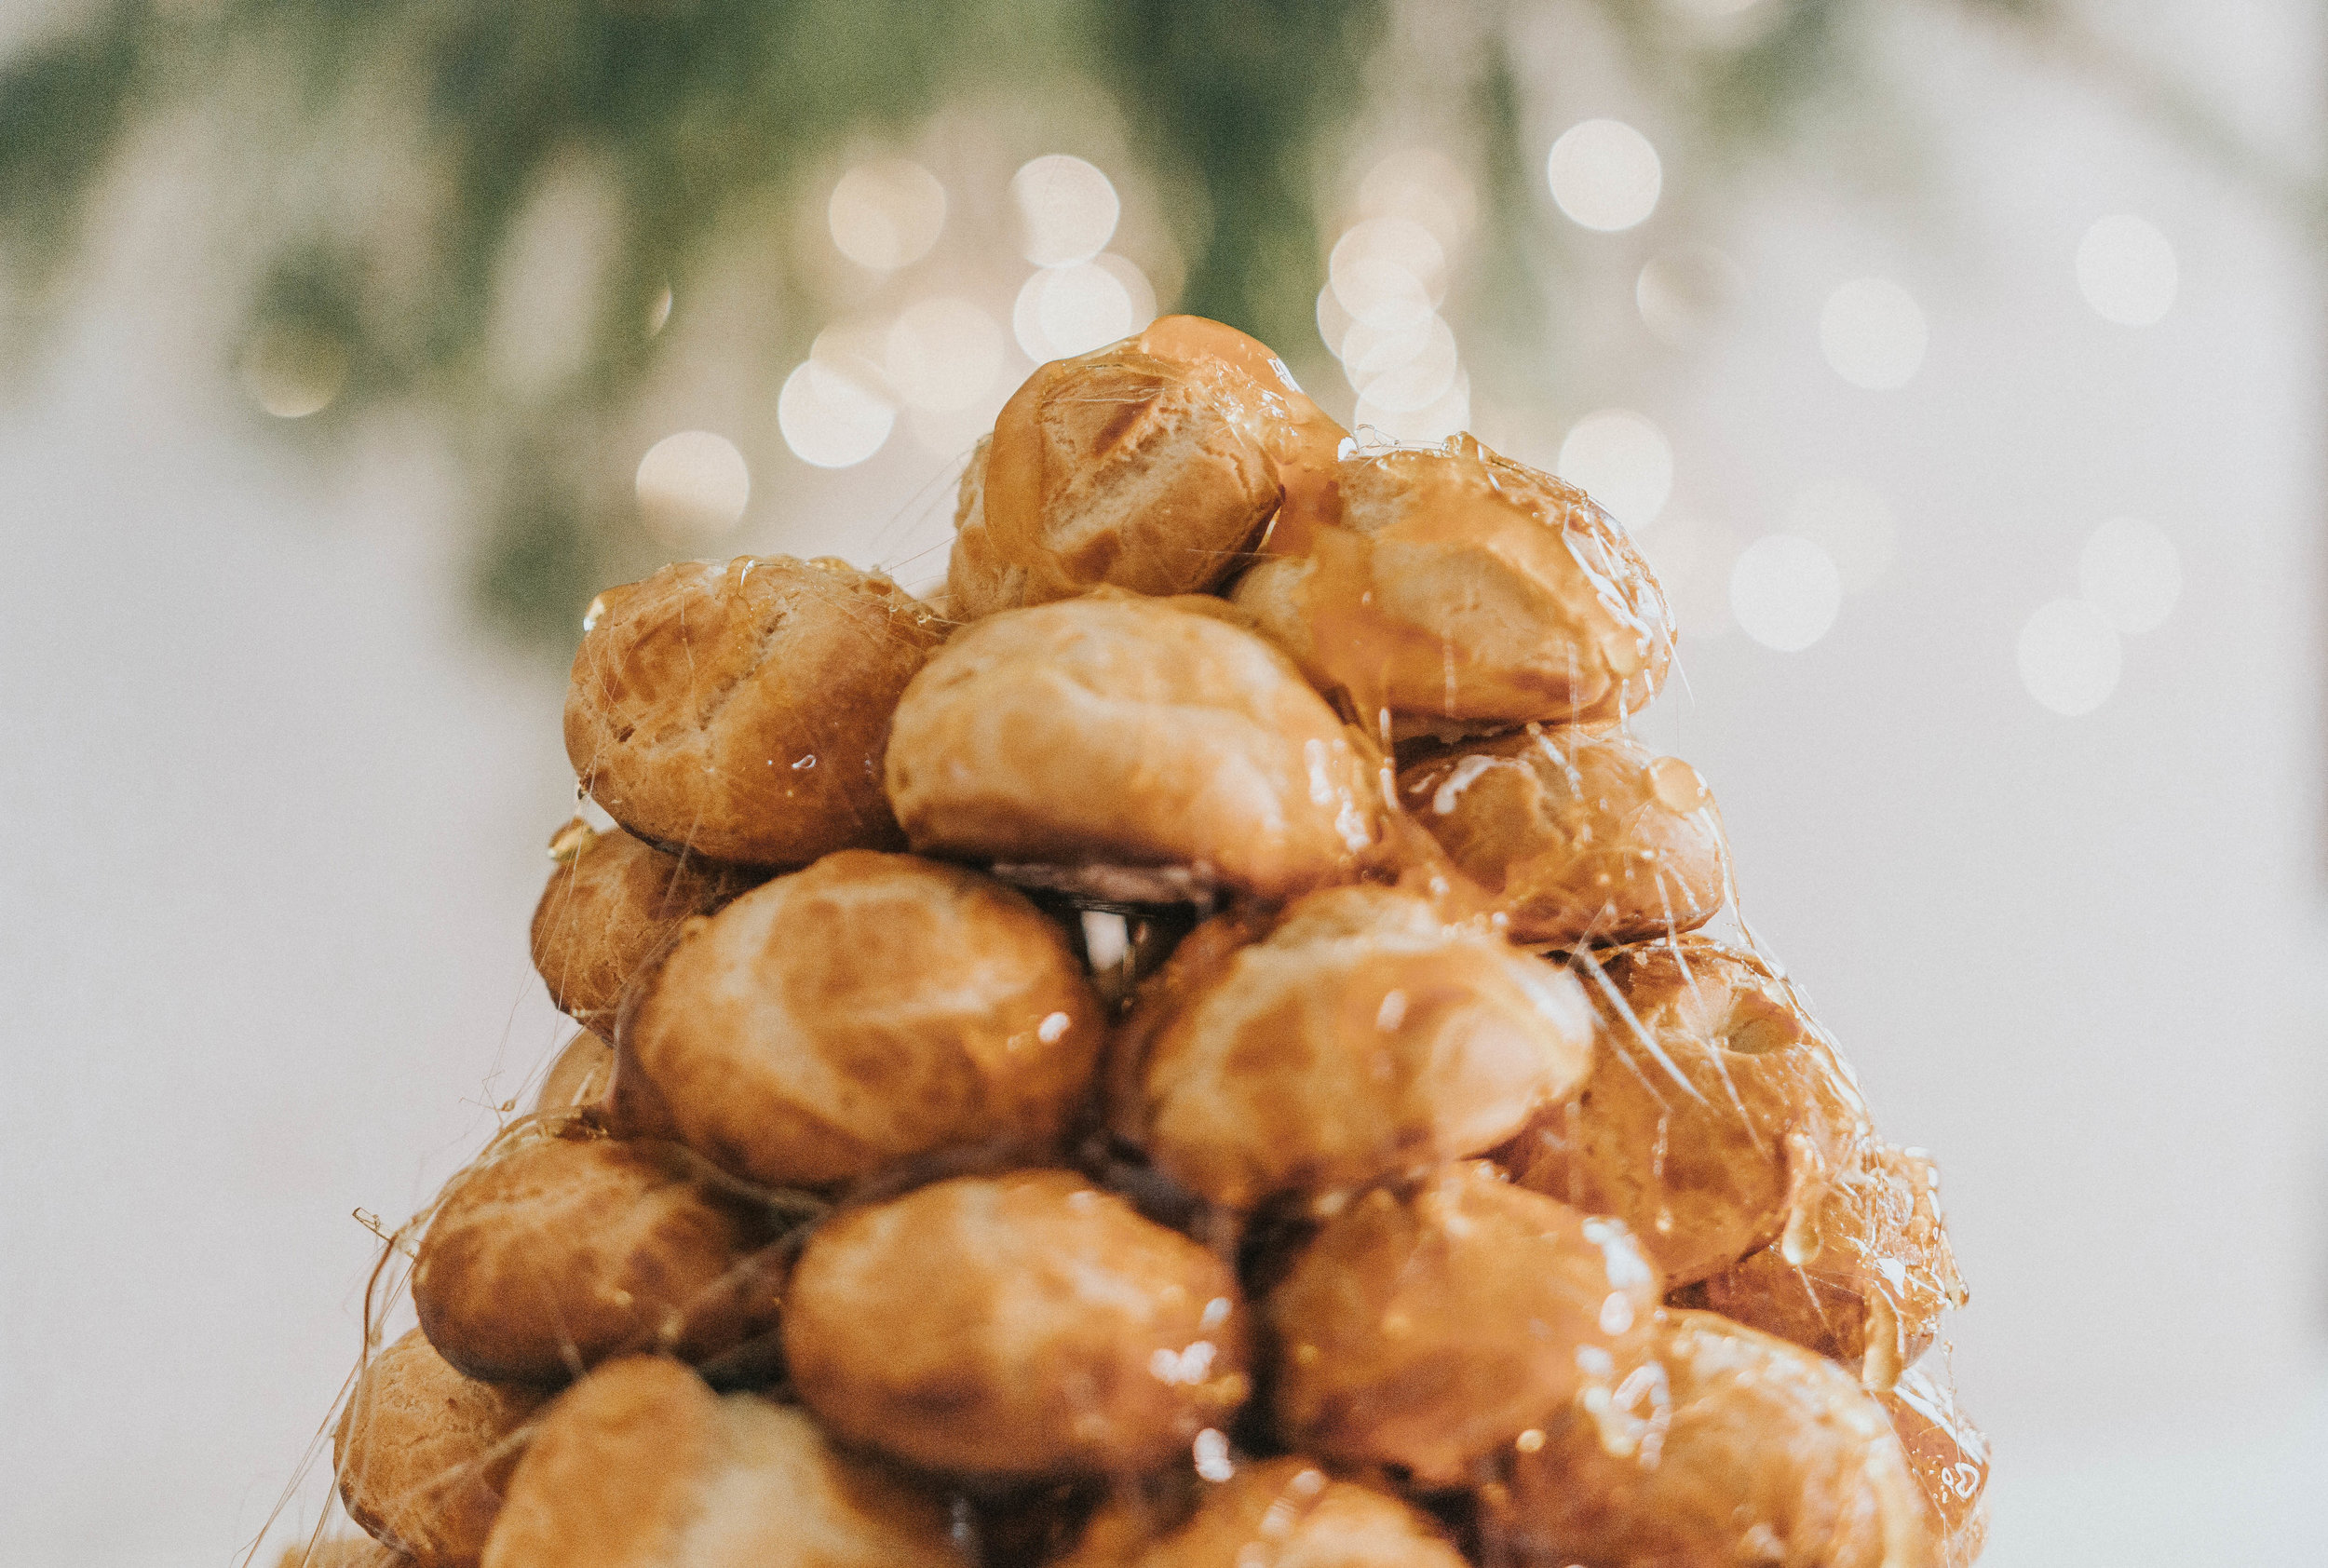
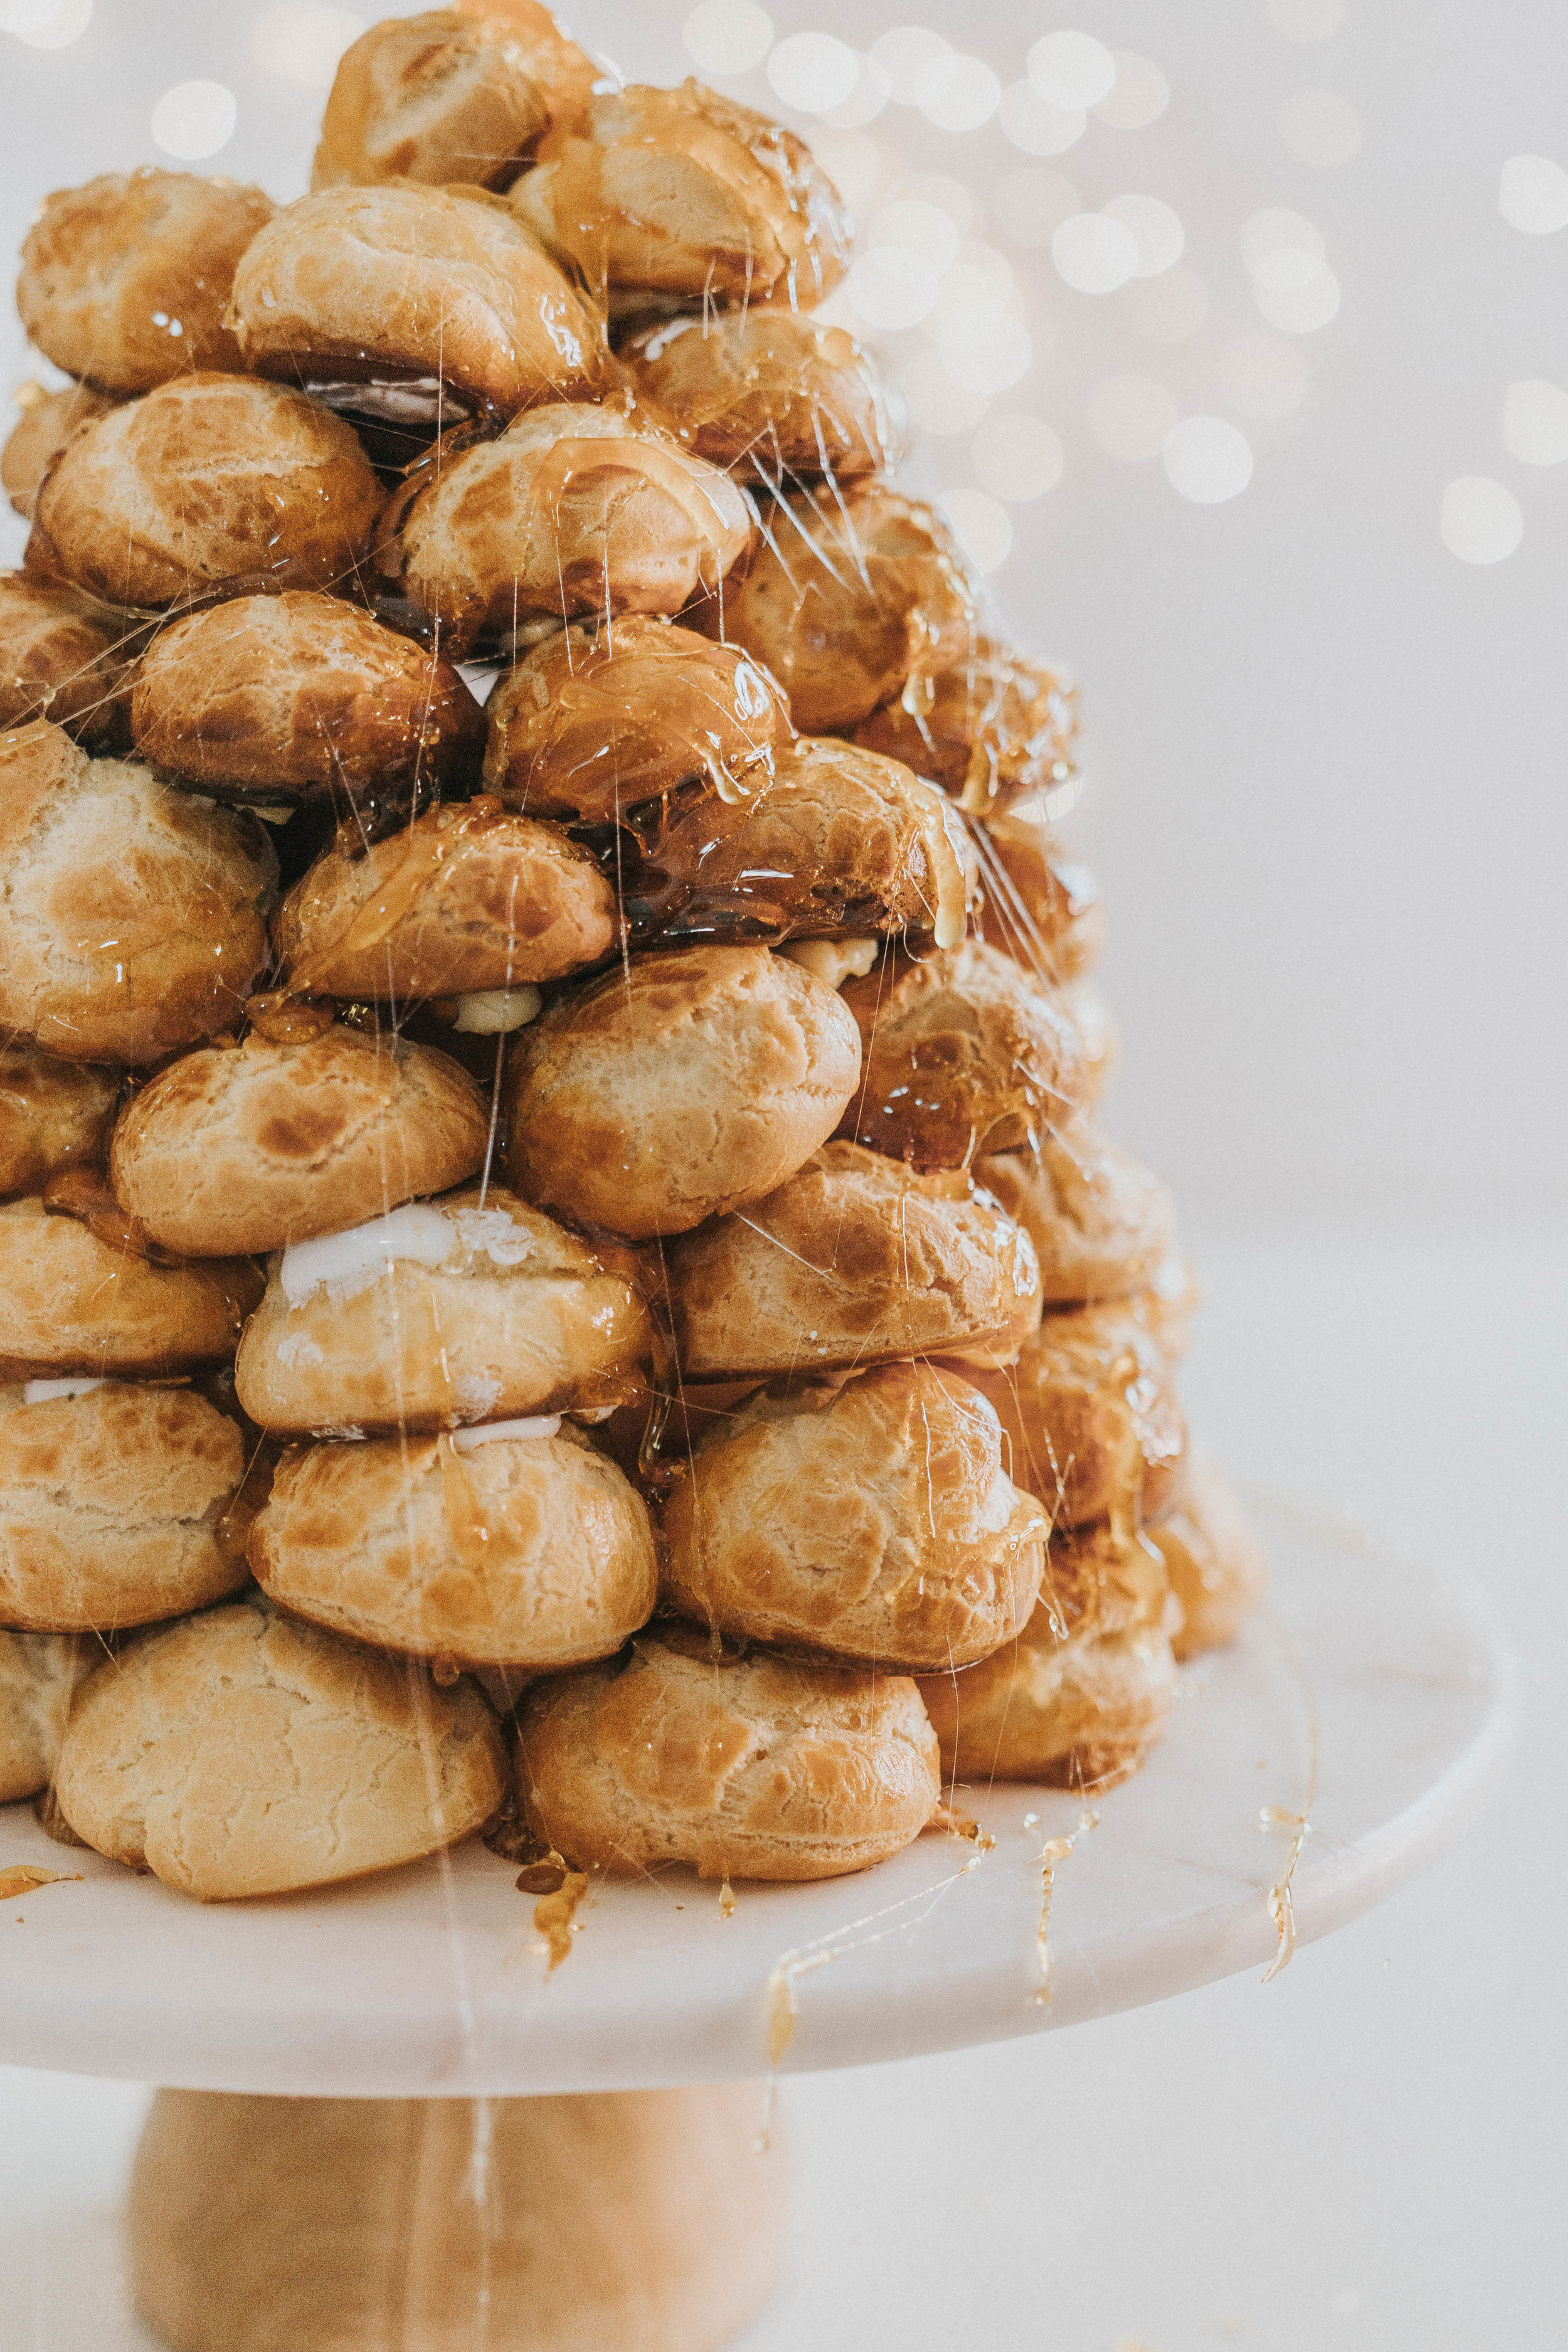
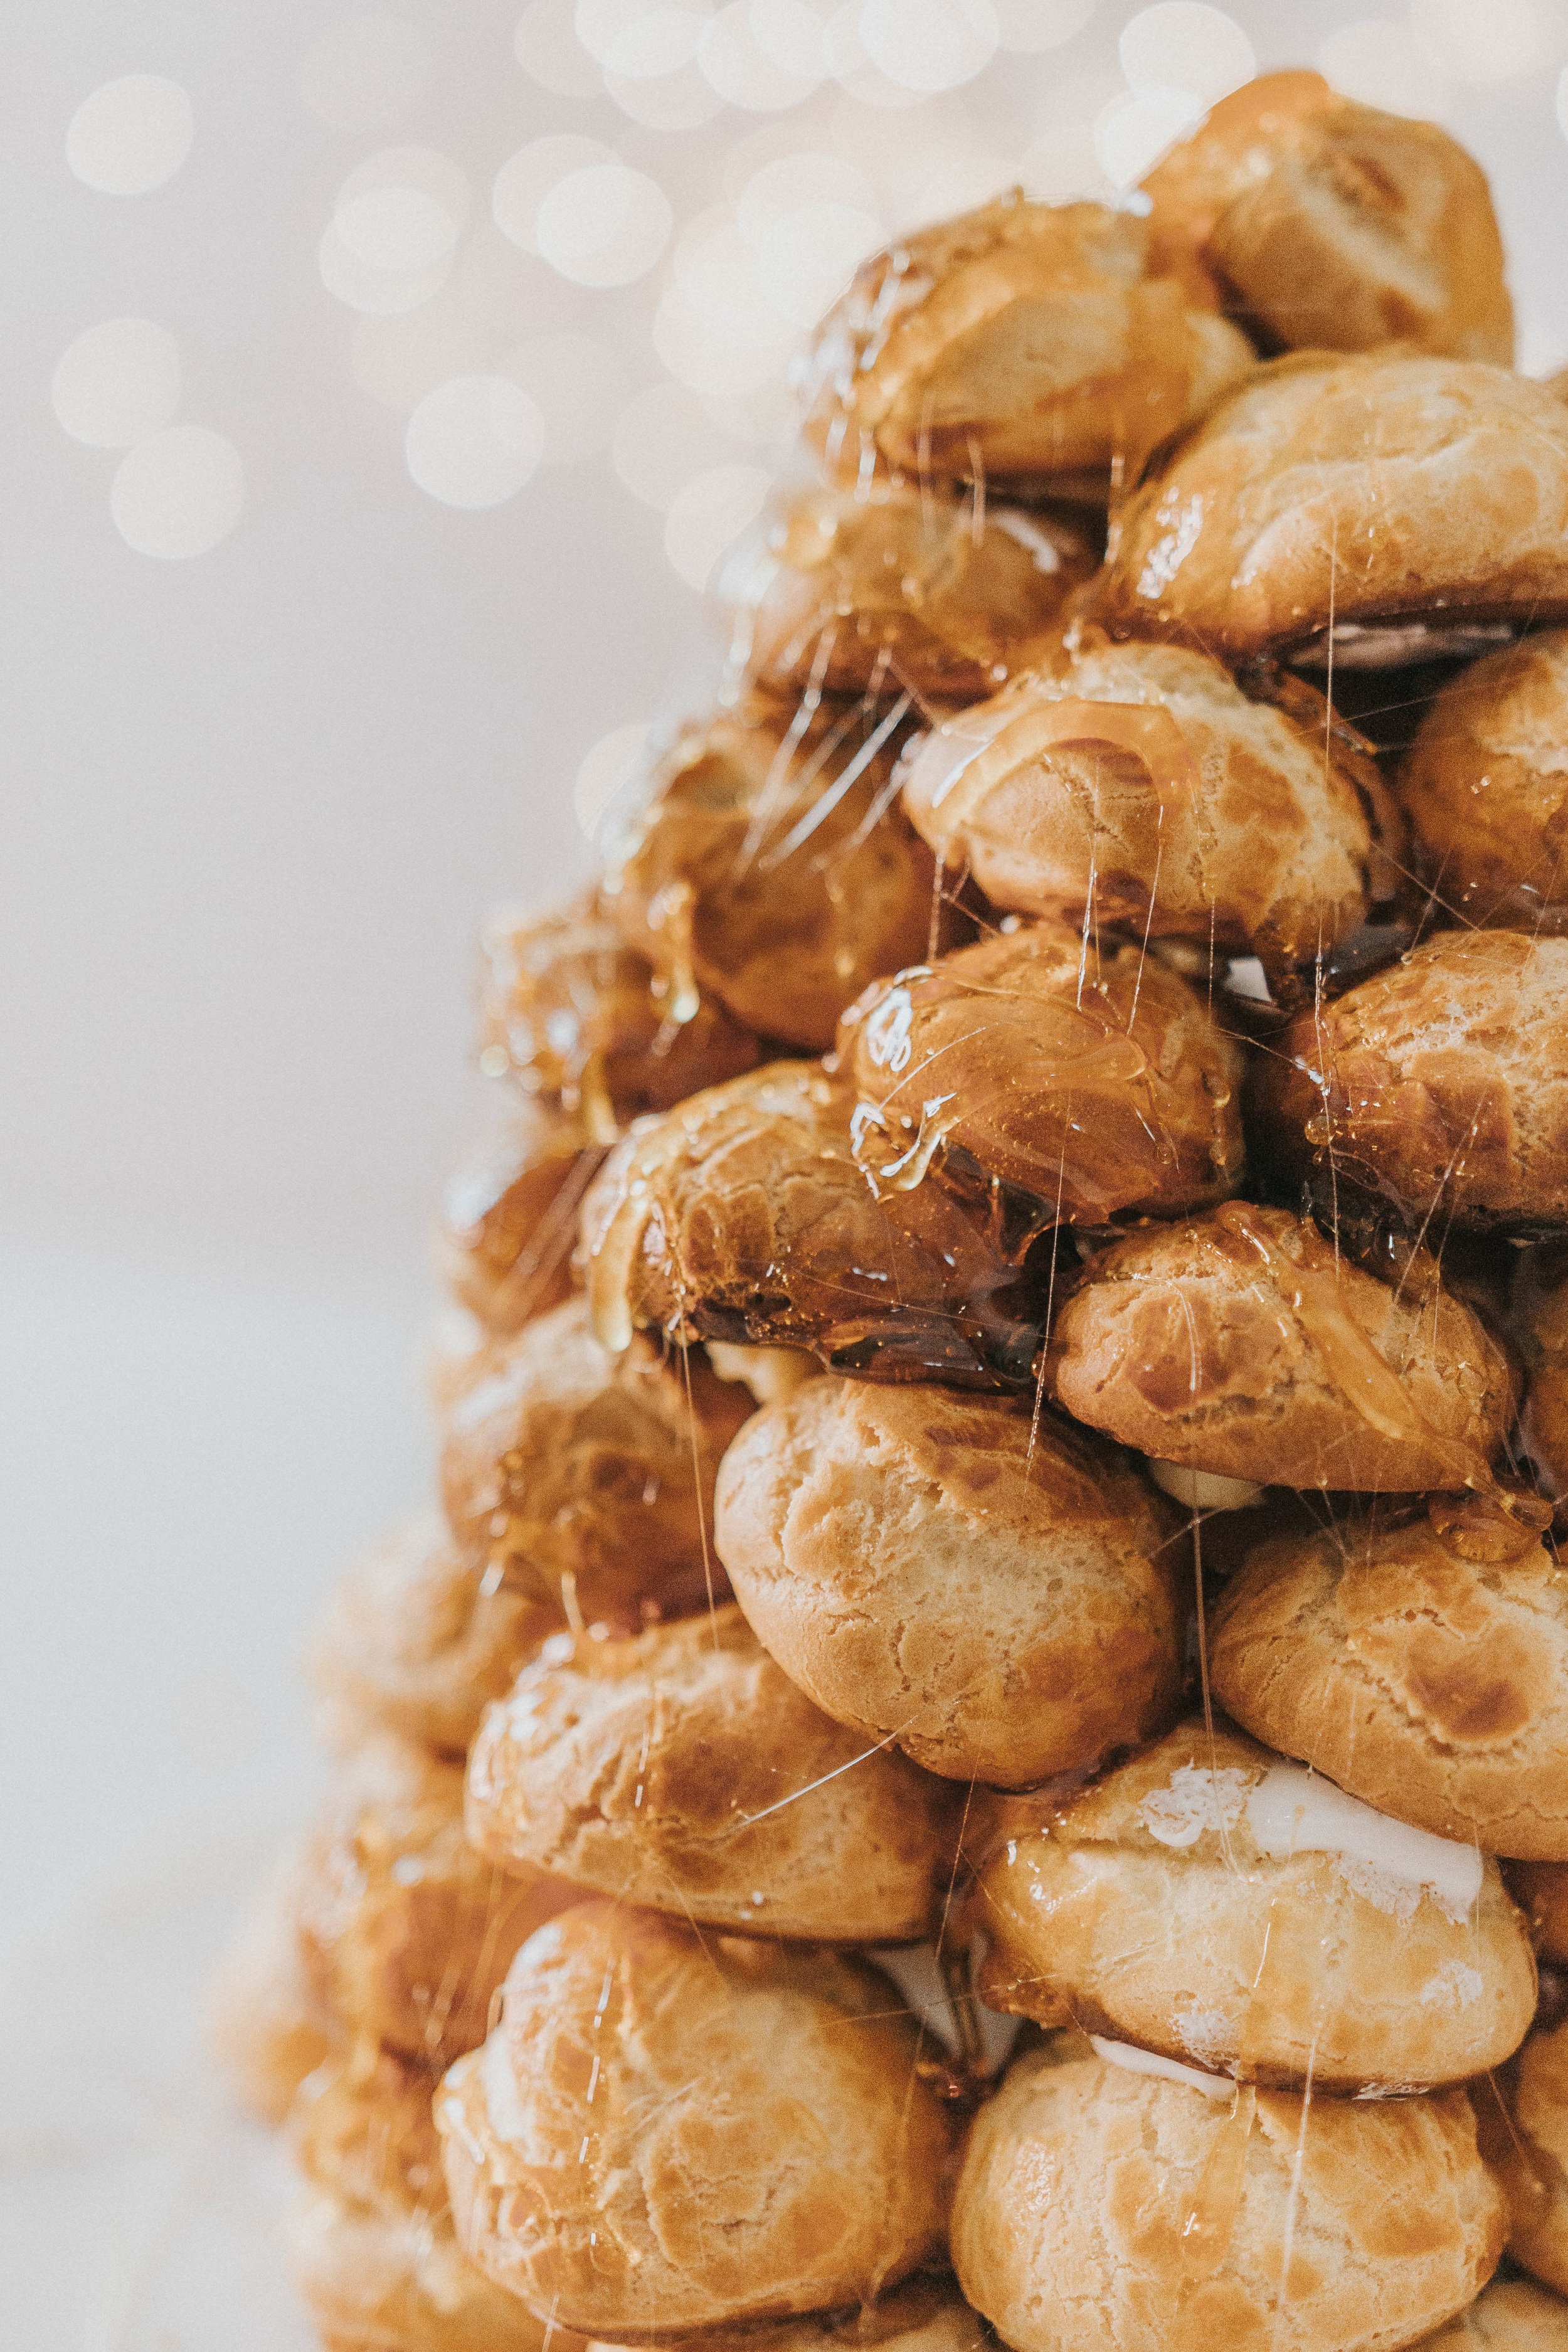

IMG_2037.jpg
IMG_2043.jpg
IMG_2042.jpg

assembly:

  1. Using a knife, poke a hole into the bottom of each puff & pipe in pasty cream

  2. On a cake stand (or whatever serving platter you’re going to use) - adhere a parchment round to act as a guide.

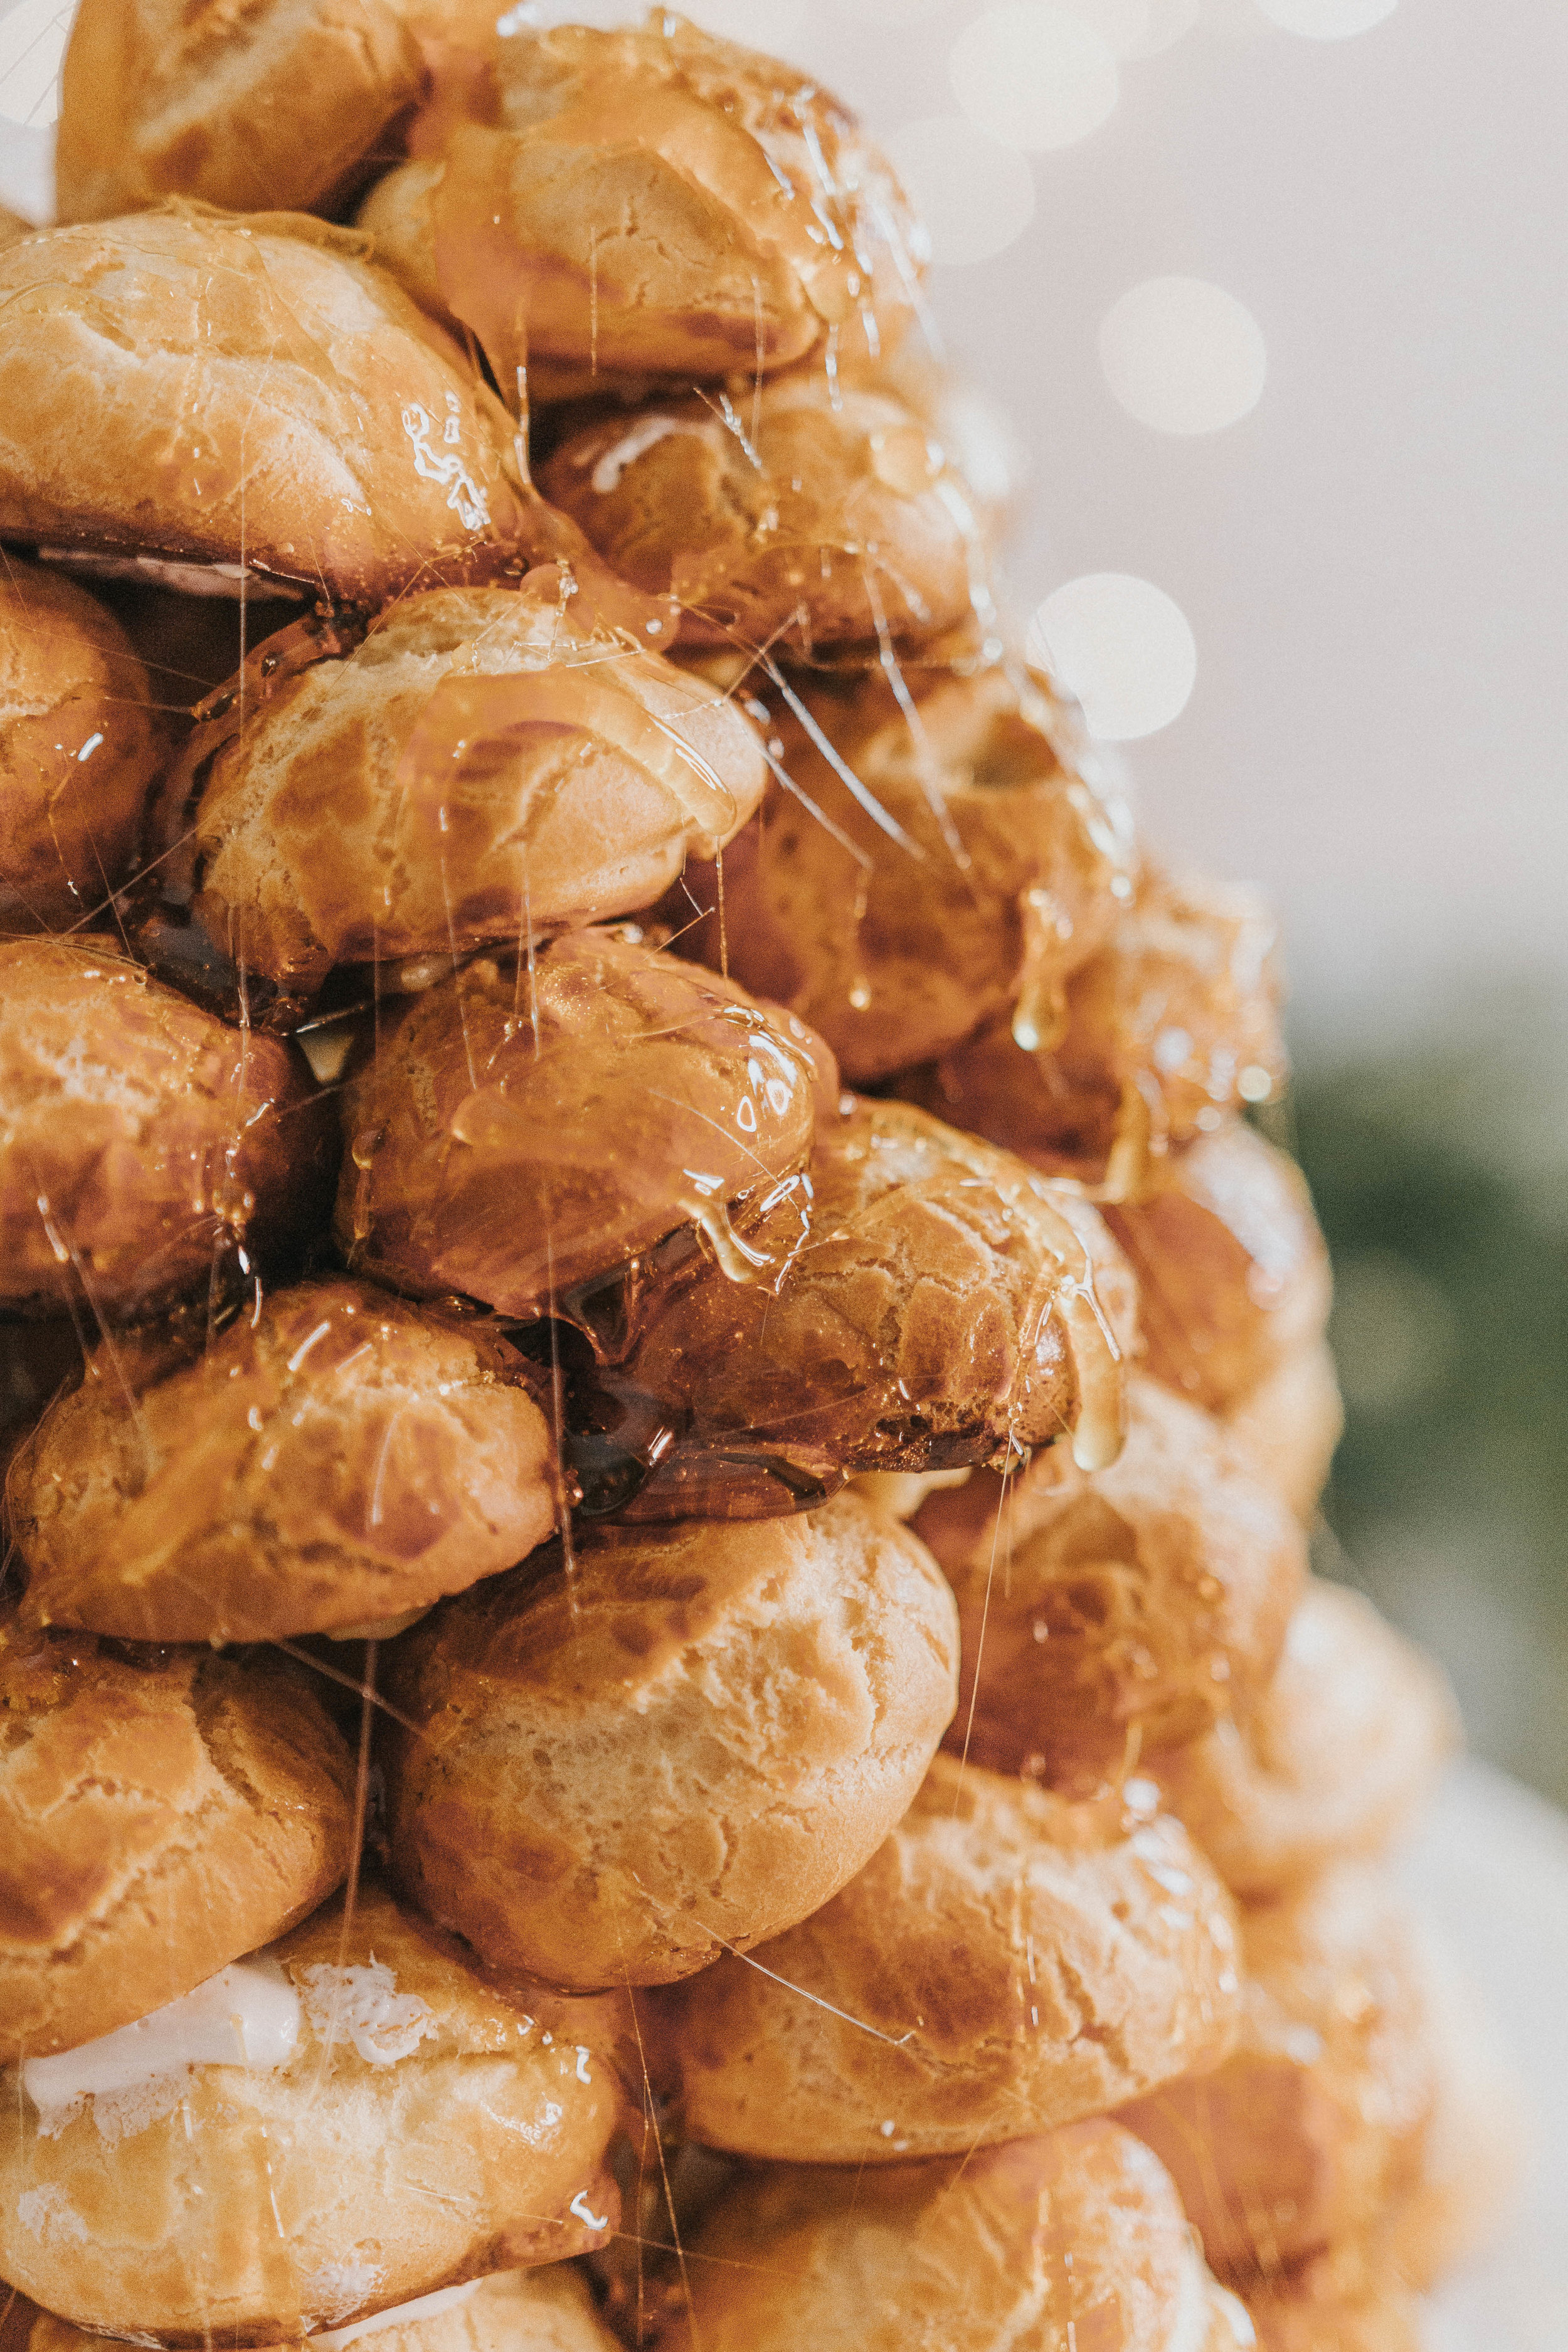
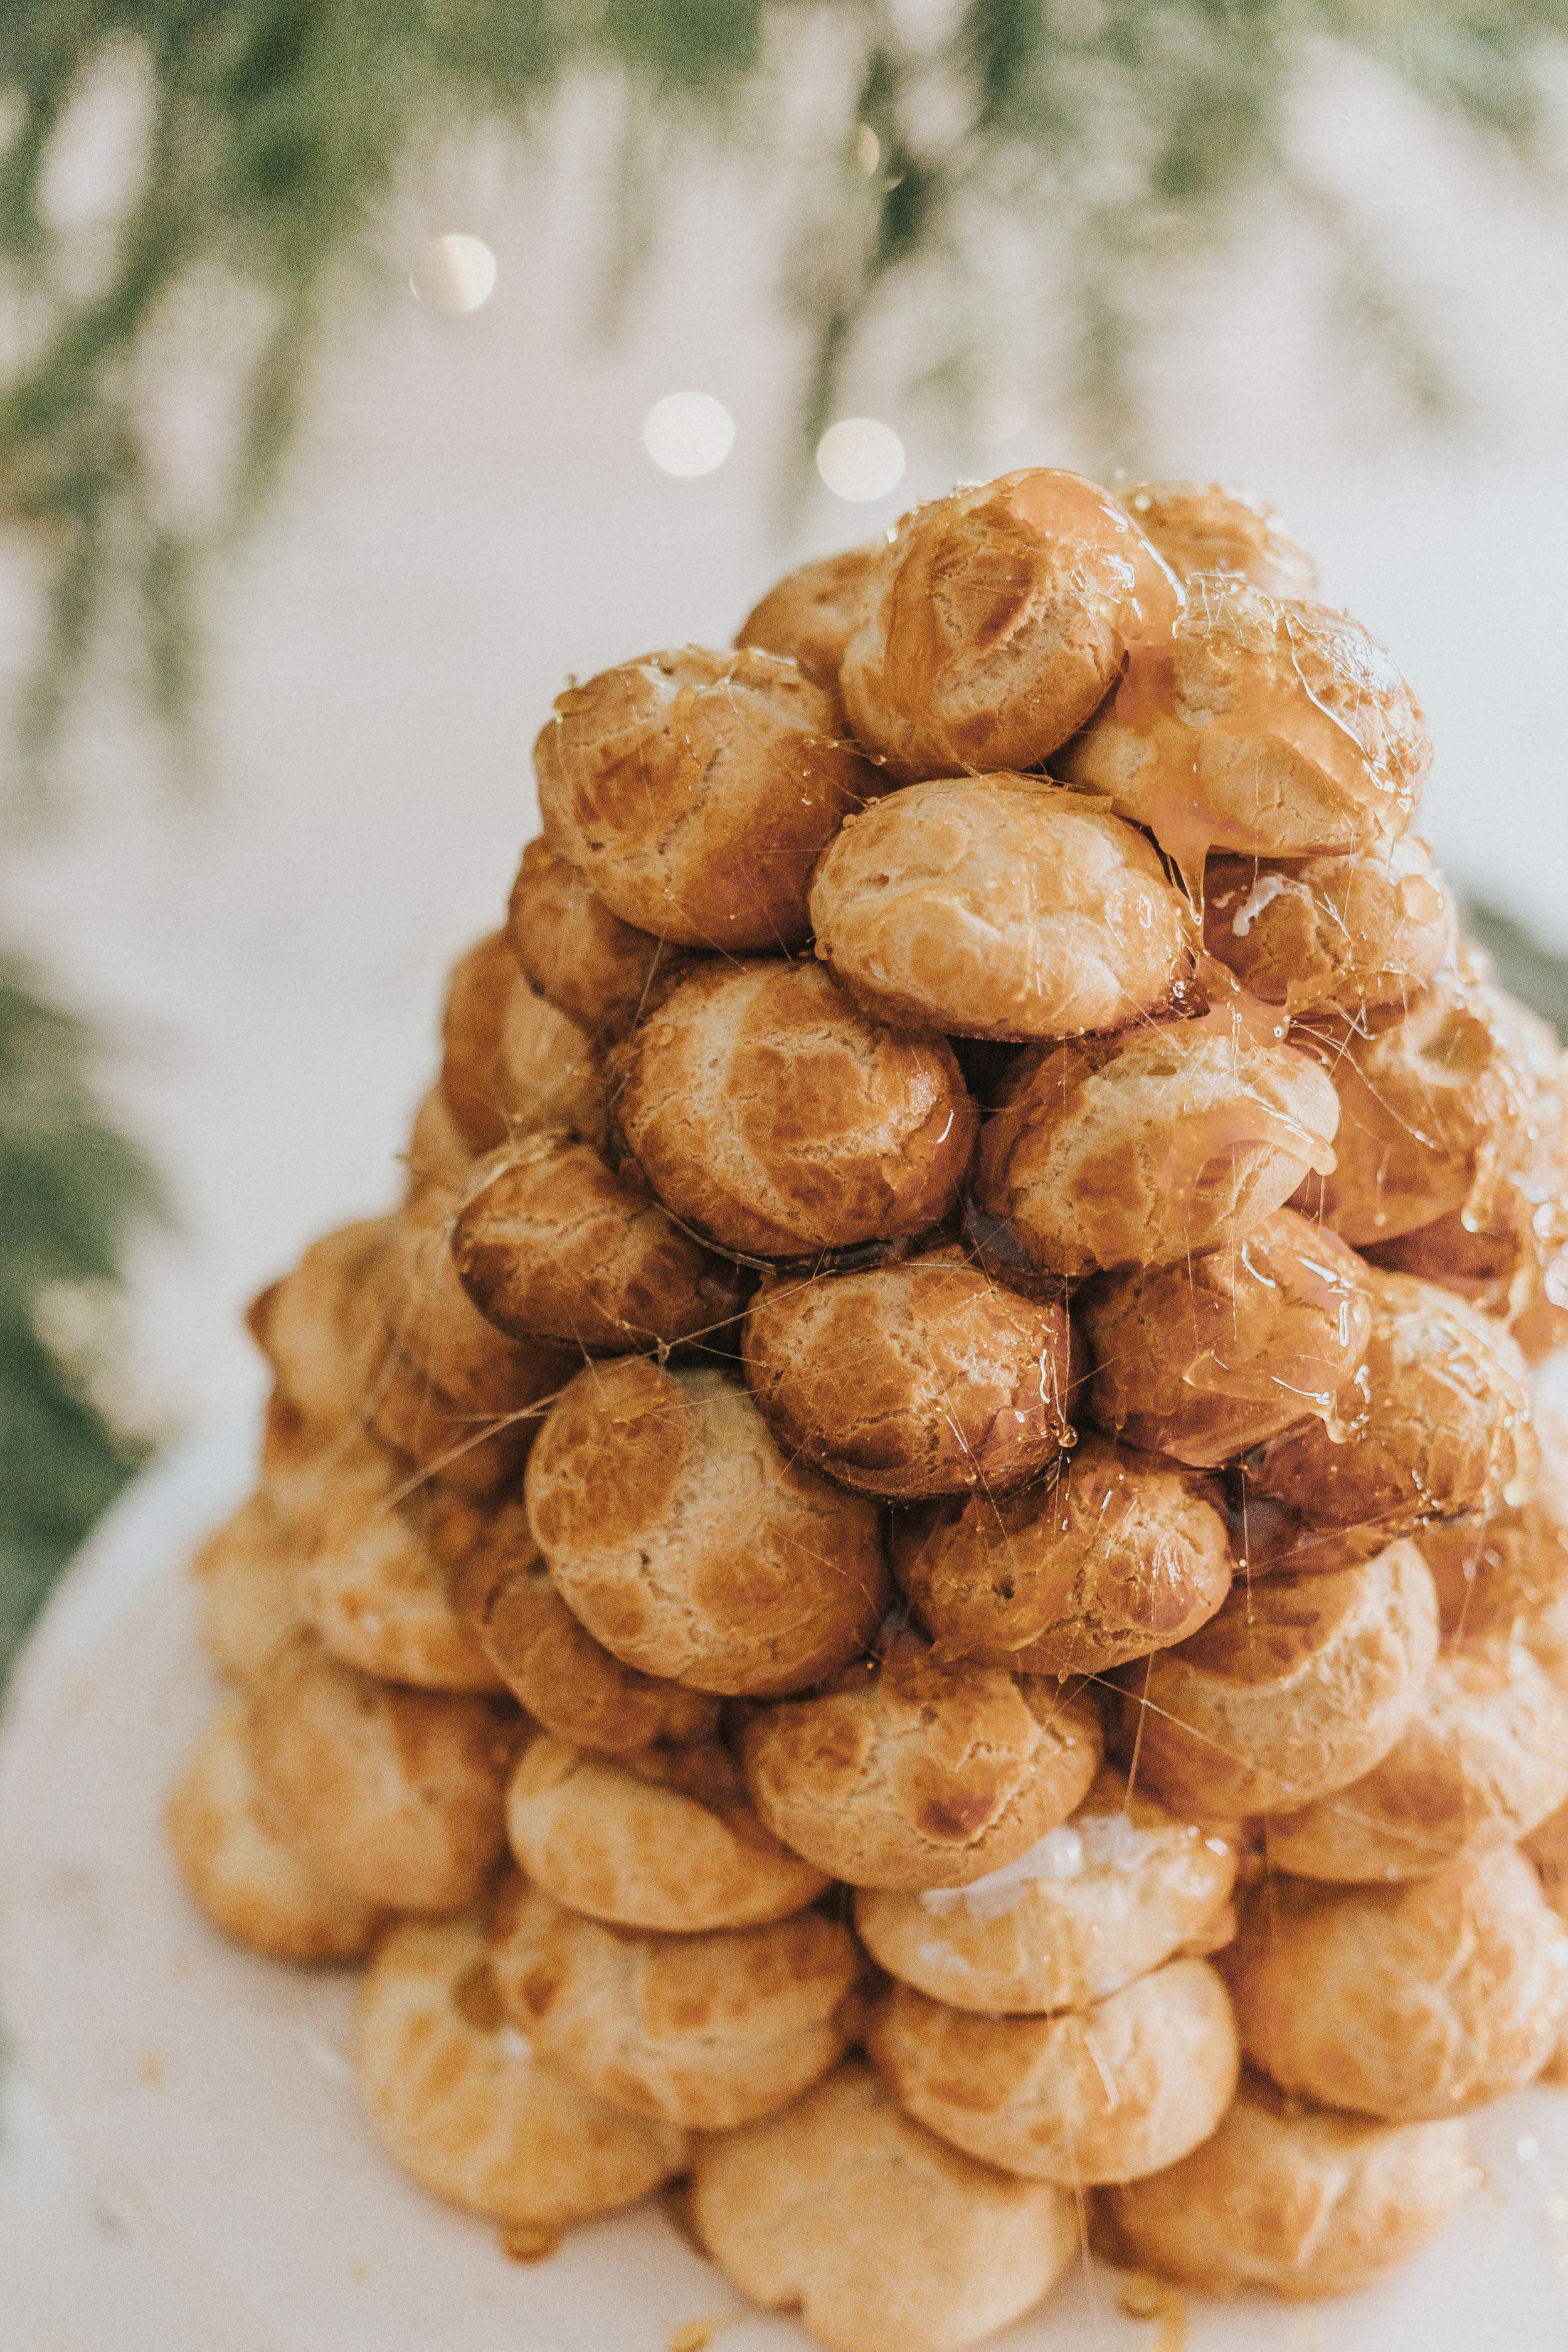
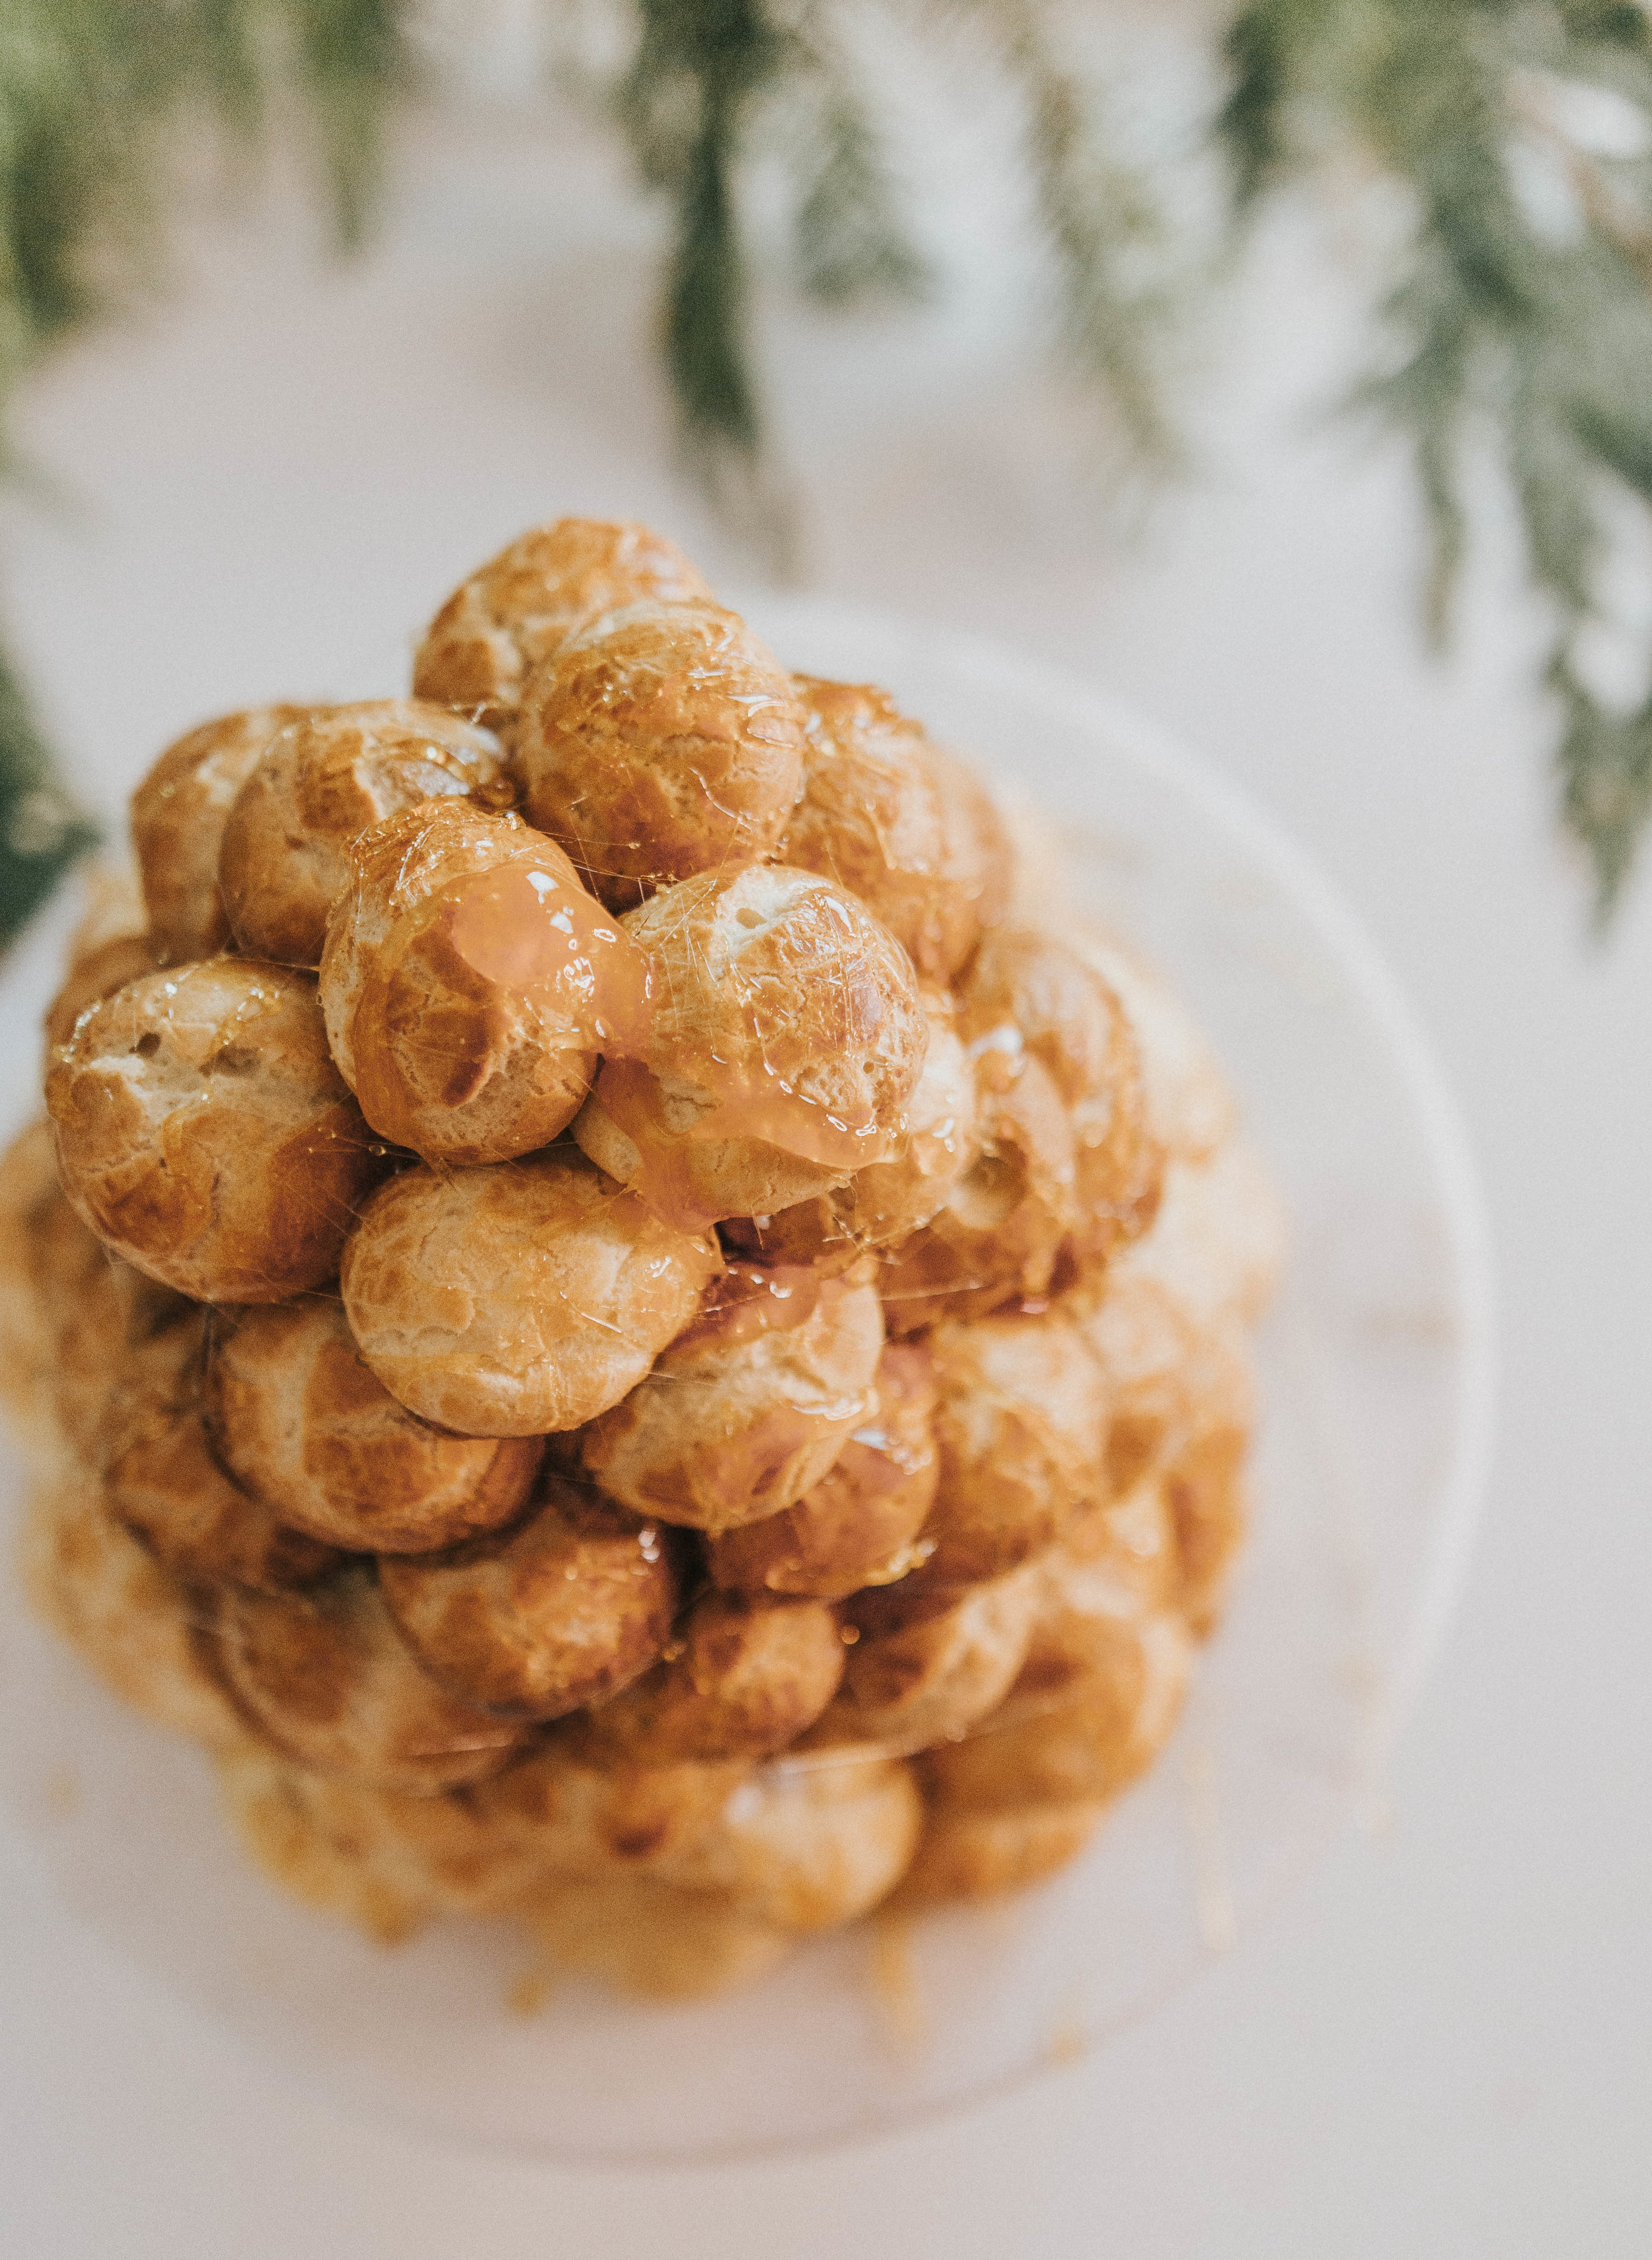
  3. Starting with the biggest (or ugliest) puffs, dip one side into the caramel (don’t burn yourself -use tongs) and begin placing them in a circle - adhering them to each other with the caramel.

  4. Continue adding layer by layer (adding less puffs each time), building up to a hollow cone shape

    • reheating the caramel as needed!

  5. Once fully assembled -let the caramel cool slightly more, then use a fork and a twirling motion to create caramel “threads” around the tower. DON’T BURN YOUR FACE OFF.

  6. Serve immediately because no like - you got like 3 hours MAX before this becomes soggier than the leftover cereal in milk.


watch the video

shop the post
 
Screen Shot 2018-12-17 at 2.05.54 PM.png

Flower Apron

Go ahead, go wild with with the powdered sugar!

Material : 100% cotton twill

What you'll get

1 adult apron with two front pockets

100% cotton twill with soil-release finish

Adjustable neck strap

Measures 22"x30"

Waist straps measure 40" in length

Machine Wash Cold - Only non-chlorine bleach when needed

shop

inspired by this recipe & this recipe


In bakemas Tags bakemas
7 Comments

Cinnamon Rolls

December 23, 2018 Meghan Rienks
IMG_1907.jpg IMG_1942.jpg IMG_1883.jpg IMG_1936.jpg IMG_1838.jpg IMG_1915.jpg

makes about 6 cinnamon rolls


for the cinnamon rolls:

1/2 cup buttermilk - WARM

1/3 cup sugar

1/2 package yeast

1/4 cup butter

1 egg

1/4 teaspoon salt

2 cups and 1/4 flour

for the filling:

6 tablespoons butter (unsalted, room temp)

1/2 cup dark brown sugar (you can use light too)

1 & 1/2 Tablespoons cinnamon

Pinch of salt


for the cream cheese frosting:

2 oz cream cheese, (full fat & room temp)

1 & 2/3 cup powdered sugar 

3 tablespoons whole milk

1 teaspoon vanilla


IMG_1914.jpg
IMG_1920.jpg
IMG_1917.jpg
IMG_1939.jpg
IMG_1936.jpg

for the cinnamon rolls:

  1. In a small bowl combine yeast, warmed buttermilk (about 100 deg F) & sugar. Stir to combine.

  2. Cover with a clean dish towel & let “bloom” for about 10 minutes or until liquid becomes foamy.

  3. Pour the yeast mixture into the bowl of a stand mixer (fitted with a dough attachment), add the softened butter & beat together. This won’t totally combine, you just want the butter broken up

  4. Add the egg - beat. Then add the salt & beat again.

  5. Turning the mixer down to low speed, gradually add the flour a bit at a time, until it’s combined

  6. Turn the mixer up to high & continue to beat until the dough pulls away from the sides of the bowl & is no longer sticky. About 7-8 minutes.

  7. Transfer the ball of dough onto a floured work surface and knead by hand for about 1-2 minutes.

  8. Place the dough ball into a greased bowl, then cover with a dish towel and let rise in a warm dry place for about 2 hours. Check size after an hour, if it’s doubled by then - you’re good to go!

  9. Prepare a baking dish with butter or baking spray and set aside.

  10. Turn out the dough onto a floured counter, and roll it out to a rectangle about 1/2 inch thick.

  11. Spread the room temp butter evenly across the dough & then do the same with the filling.

  12. Tightly roll the dough into a log - then cut the ends off. Cut again into 6 even pieces.

  13. Place them in the prepared baking dish & cover tightly with tinfoil before refrigerating over night (8-12 hours)

  14. The next morning, take the rolls out of the fridge and let come up to room temperature (still covered)

  15. Bake off in a 375F degree oven for about 30 minutes, checking at 15 minutes to see if the tops are getting too brown (if so, tent with foil)

  16. Let the rolls cool slightly - then, while still warm, cover with even layer of cream cheese frosting

  17. Let the rolls cool again (10-15 minutes) before serving


IMG_1945.jpg
IMG_1928.jpg
IMG_1932.jpg
IMG_1926.jpg

for the filling:

  1. In a medium bowl combine brown sugar, cinnamon & salt - set aside until ready to use.


for the cream cheese frosting:

  1. In large bowl using an electric mixer, whip the cream cheese slightly until smooth.

  2. Add half the milk, the vanilla & about a third of the powdered sugar & beat again.

  3. Alternate between adding powdered sugar & milk until desired consistency and taste is achieved.

  4. Set aside until ready to use.


IMG_1866.jpg
IMG_1857.jpg
IMG_1860.jpg

WATCH THE VIDEO
In bakemas
10 Comments

Hot Chocolate Cake

December 21, 2018 Meghan Rienks
IMG_1559.jpg IMG_1583.jpg IMG_1580.jpg IMG_1563.jpg IMG_1582.jpg IMG_1585.jpg

the cake

1 1/2 cups all-purpose flour

1 1/2 cups granulated sugar

3/4 cup cocoa sifted

1 1/2 tsp baking soda

1 tsp baking powder

1 tsp salt

1/4 cup vegetable oil

1 cup buttermilk

1 cup strong brewed coffee hot

2 large eggs

2 tsp vanilla


the marshmallow Filling

1/3 cup water

3/4 cup granulated sugar

3/4 cup agave (or corn syrup or honey)

3 large egg whites room temperature

1/2 tsp cream of tartar

1 tsp vanilla


the Hot cocoa buttercream

1 cup butter, room temperature

7-8 cups powdered sugar

1 & 1/2 to 2 packs of dry hot chocolate mix (without mini marshmallows)

1 1/2 - 2 tablespoons cocoa powder

2/3 cup + 2 Tbsp heavy cream

for decor

Whole marshmallows, cut up marshmallows, & mini marshmallows depends on how many you want to use!

Cake topper


IMG_1568.jpg
IMG_1572.jpg

for the cake:

  1. Start by pre-heating your oven to 350 F & prepping 3 6-inch round cake pans with baking spray/butter, and lining with parchment paper.

  2. Place all the dry ingredients into the stand mixer & combine

  3. In a separate bowl, combine wet ingredients (make sure coffee has cooled before adding)

  4. Add the wet into the dry and mix thoroughly

  5. Pour batter into the prepared cake tins

  6. Bake for 20-35 minutes at 350 F or until a toothpick comes out clean

for the marshmallow filling:

  1. In a medium saucepan, combine water, sugar, & agave (or corn syrup or honey)

  2. Stir to combine - but don’t continue because crystals will form.

  3. When the sugar syrup is about 225°F, - start to whip the egg whites & cream of tartar together, for about 4 minutes - until soft peaks have formed.

  4. If timing is on your side, the egg whites should be done around the same time that the syrup reaches 240°F - if the heat comes up too fast, turn it down

  5. When the mixture is at 240°F SLOWLY drizzle the liquid into the stand mixer beating on LOW. You want to do this craaaazy slowly but at a constant speed.

  6. Once it’s been added, turn it up to high & whip until thick & glossy.

  7. Add the vanilla & continue to whip until the bowl is cool to the touch.

  8. Fill a piping bag & set aside.

for the hot cocoa buttercream:

  1. In a large bowl, beat the room temp butter until it begins to get fluffy

  2. Add half of the hot cocoa mix & the cocoa powder- beat again

  3. Alternate with adding in the powdered sugar (a bit at a time) and the heavy cream.

  4. Begin to taste the frosting & add cocoa, hot cocoa & powdered sugar to your taste.

  5. Add in cream until you’ve reached your desired flavor & consistency.

  6. Fill a piping bag & set aside.


IMG_1580.jpg
IMG_1582.jpg


assembly:

  1. Use marshmallow fluff to adhere a cake board to your lazy susan, then a bit more to adhere the cake to that.

  2. Place the first (and ugliest) cake layer on the board, and pipe an even layer of marshmallow filling, using an offset spatula to smooth it out.

  3. Repeat with the other two layers.

  4. Crumb coat the cake with the hot cocoa frosting & set aside in the fridge to cool for about 25 minutes.

  5. Once the cake is out of the fridge, add on your final coat of buttercream & using the tip of the spatula, create a wavy pattern in the buttercream.

  6. Using the leftover marshmallow filling as glue, place whole, chopped & mini marshmallows on top of the cake & around the base.

  7. VERY CAREFULLY AND ONLY IF UR AN ADULT - use a kitchen torch to toast the marshmallows, being careful not to melt the buttercream

  8. Finish with the cake topper & place into the fridge for at least another 15 minutes before you cut it

  9. Enjoy!


Blank YouTube Display Ad Long.png
 
Screen Shot 2018-12-17 at 2.05.59 PM.png

Antler Cupcake Topper

Top off the holiday fun with a sleigh-ful of reindeer. I’m more of a Vixen myself ;)

What you'll get

1 - 3.5" Acrylic Cupcake Topper

shop

watch the video
In bakemas Tags bakemas
6 Comments

Salted Caramel Spice Cake

December 17, 2018 Meghan Rienks
IMG_1652.jpg IMG_1772.jpg IMG_1822.jpg IMG_1619.jpg IMG_1631.jpg IMG_1805.jpg IMG_1789.jpg IMG_1820.jpg

FOR THE CAKE:


3/4 cup vegetable oil

2 cups brown sugar

3 large eggs, room temperature

2 teaspoons vanilla

2½ cups all-purpose flour

1 tsp baking powder

1 tsp baking soda

½ teaspoon salt

1 & ½  teaspoons ground ginger

2 teaspoon ground cinnamon

½ teaspoon ground nutmeg

½ teaspoon ground allspice

½ teaspoon ground cloves

1 cup buttermilk, room temperature

1 Tablespoon molasses

FOR THE cream cheese frosting:

12 tablespoons unsalted butter (room temperature)

12oz cream cheese (room temperature)

3 cups powdered sugar, sifted

1 & ½ teaspoons vanilla

FOR THE salted carameL:

1 cup caster sugar

6 tablespoons unsalted butter, softened to room temp (cut up)

1/2 cup heavy cream

1 & ½ teaspoons salt


for the cake:

  1. Pre-heat oven to 350 & prepare 3 six inch cake pans with baking spray & parchment paper

  2. In a large bowl, whisk together the wet ingredients (sugar, oil, vanilla, eggs, buttermilk & molasses) until smooth - set aside

  3. In a medium bowl, combine your dry ingredients (flour, baking soda, baking powder, salt & spices)

  4. Add the dry ingredients to the wet in thirds, using a whisk or a spatula to fold the mixture together until it’s fully combined.

  5. Divide the batter evenly between the 3 cake tins and bake for 25-30 minutes or until a toothpick comes out clean from the center.

  6. Let the layers cool in their tins for about 10 minutes, then turn the cakes out onto a wire rack to fully cool.

    • if making the cake layers a few days ahead - after they’ve cooled, wrap them in saran wrap & refrigerate overnight or freeze until use!


for the frosting:

  1. In a large bowl whip the cream cheese using an electronic mixer (handheld, or stand) - whip until just soft

  2. Add the butter & and continue to whip until fluffy.

  3. With the mixer on low, add in the powdered sugar a small bit at a time - whipping between each addition.

  4. Once you’ve added in half, begin to taste between additions to get the sweetness you like!

  5. Fill a piping bag with the frosting & set aside


for the salted caramel:

  1. In a medium saucepan over medium heat - add the sugar, stirring constantly with a wooden spoon (everything else will melt)

  2. It’ll take a while - but the sugar will start to clump like sand, then it’ll dissolve into a dark caramel color liquid (don’t let it get past this & burn!)

  3. Once the sugar has melted, add in the butter. Continue to stir until completely melted.

  4. Next SLOWLY drizzle in the heavy cream, again stirring constantly, being careful not to let it boil over (there will be hot bubbles so be careful!)

  5. Let the mixture boil for about 1 minute, then take it off the heat, stir in the salt & set aside to cool for 4-5 minutes.

  6. Once it’s slightly cooled- pour it into a heat safe jar & let it cool again before serving!

  7. Once it’s cool & thickened (it’ll get thicker the colder it gets) transfer some of it into a piping bag & set aside

    • this makes a decent amount you’ll want to store the leftovers in something airtight in the fridge!


assembly:

  1. Once the cakes have completely cooled- level them & split them down the middle, going from 3 cake layers- to 6.

  2. On a turn table with a cake board adhered with frosting - start by placing the first cake layer down.

  3. Spread an even layer of cream cheese icing over, and top with another cake layer, repeating until all the layers are stacked with cream cheese.

  4. Using an off-set spatula and a cake scraper, smooth the sides of the cake, adding more frosting to where you see fit until you like it’s “naked-ness”

    • If you find your frosting to be really soft & your cake feels unstable - place it in the fridge for about 20 minutes before adding the salted caramel

  5. Starting at the center of the top of the cake, drizzle the salted caramel in an even layer, then begin drip it down the sides.

  6. Finish off with a cake topper & serve!


Blank YouTube Display Ad Long.png
 
Screen Shot 2018-12-17 at 2.06.09 PM.png

‘merry christmas’ cake topper

What you'll get

1 - 7" Acrylic Cake Topper

shop
 
39214_Apron_Slider_original.jpg

‘flower’ apron

What you'll get:

1 adult apron with two front pockets

100% cotton twill with soil-release finish

Adjustable neck strap

Measures 22"x30"

Waist straps measure 40" in length

Machine Wash Cold - Only non-chlorine bleach when needed

shop
 

WATCH THE VIDEO
In bakemas
3 Comments

Sweet & Salty Cookies

December 12, 2018 Meghan Rienks
IMG_1440.jpg IMG_1425.jpg IMG_1514.jpg IMG_1480.jpg IMG_1434.jpg IMG_1468.jpg

for the cookie base


3/4 stick of butter (softened to room temp)

3/4 cup packed dark brown sugar

1/4 cup caster sugar

1 egg (room temp)

2 teaspoons vanilla

1 & 1/4 cup flour

1 teaspoon baking soda

½ teaspoon salt


for the salty cookies:

½ cup semi sweet chocolate chips

½ cup peanut butter chips

½ cup crushed pretzels

½ cup crushed potato chips

for the sweet cookies:

1/4 teaspoon almond extract

3/4 cup white chocolate chips

3/4 cup dried cranberries


IMG_1468.jpg
IMG_1454.jpg
IMG_1466.jpg

for the cookie base:

  1. In a bowl of a stand mixer fitted with a whisk attachment (or using an electric hand mixer) whip the butter for 1-2 minutes

  2. Scrape down the sides, add the sugars & cream until pale, light & fluffy (3-5 minutes)

  3. Scraping down the sides (again) add in the egg, and beat. Then vanilla & beat again.

    • if making the sweet cookies, add the almond extract here as well

  4. In a medium bowl whisk together the dry ingredients until combined.

  5. With the mixer on low, and using a large spoon, gradually add the dry to the wet, mixing until just combined.

  6. Add in your toppings, reserving a few to strategically place before baking.

  7. Using a cookie scoop (or a spoon, or your hands) scoop out dough onto a lined baking sheet.

  8. Place in the fridge for at least 5-10 minutes, or freeze them off to bake at a later date

  9. Pre-heat the oven to 350 & bake for 7-11 minutes depending on the size of your cookies


IMG_1518.jpg
Screen Shot 2018-12-11 at 2.16.28 PM.png

get my baking bundle

What you'll get

1 - 4" x 1.75" stamp

1 - white ink pad

1 - twine

1 - 3.25" cookie cutter

1 - 4.75" x 2.5" x 9.5" kraft bag with window

8 - 2.5" circular gift tags


watch the video
In bakemas
4 Comments

Gingerbread Cheesecake

December 11, 2018 Meghan Rienks
IMG_1172.jpg IMG_1167.jpg IMG_1205.jpg

FOR THE GINGERSNAP CRUST

2 cups gingersnap cookie crumbs

½ cup  butter (melted)

1/8 teaspoon kosher salt

1 tsp cinnamon

IMG_1273.jpg
IMG_1280.jpg
IMG_1286.jpg

FOR THE CHEESECAKE FILLING


32 oz cream cheese, room temperature (full fat, not whipped)

2  cups granulated sugar

2 teaspoon vanilla extract

4 eggs (room temp)

1/3 cup un-sulphured molasses (not blackstrap)

¼ teaspoon salt

1 ½ teaspoon ginger

2 ½ teaspoons cinnamon

1 teaspoon nutmeg

¼ all spice

½ cloves

½ teaspoon lemon zest


IMG_1309.jpg
IMG_1300.jpg
IMG_1315.jpg
IMG_1301.jpg
IMG_1318.jpg
IMG_1314.jpg

for the crust:

  1. Preheat oven to 350 degrees & prepare a springform pan by wrapping the sides & bottom with tinfoil

  2. In a large bowl, combine gingersnap crumbs, butter, cinnamon & salt until it begins to clump

  3. Using the palm of your hand or the base of a flat cup/bottle, press the crumbs into the pan evenly, bringing it up the sides until a tightly packed crust is formed.

  4. Bake for about 10 minutes or until it’s no longer sticky, but not fully baked. Set aside to cool.

  5. Reduce the oven temp down to 325 degrees

  6. In a stand mixer (or in a large bowl with an electric hand mixer) whip the cream cheese until fluffy (3-4 minutes)

  7. Scrape down the sides & beat in the sugar until fully incorporated.

  8. With the mixer on low, the eggs one at a time, mixing well between each.

  9. Finally beat in the molasses, salt & spices until well combined.

  10. Place the springform pan with the crust onto a deep rimmed baking sheet, & pour the cheesecake filling into the springform pan.

  11. Transfer to the oven & fill the pan with water- being careful not to overflow the pan

  12. Bake for 60-65 minutes, the cheesecake should be set, but still have a bit of a jiggle to the middle.

  13. Cool completely on wire rack, then transfer to the fridge to chill overnight

  14. Serve!


IMG_1323.jpg
IMG_1311.jpg
Screen Shot 2018-12-11 at 2.16.28 PM.png

get my baking bundle

What you'll get

1 - 4" x 1.75" stamp

1 - white ink pad

1 - twine

1 - 3.25" cookie cutter

1 - 4.75" x 2.5" x 9.5" kraft bag with window

8 - 2.5" circular gift tags


watch the video
In bakemas
Comment

Churros

December 10, 2018 Meghan Rienks
IMG_0893.jpg IMG_0894.jpg IMG_0914-2.jpg IMG_0896.jpg IMG_0898.jpg


FOR THE CHURROS


2 & 1/4 cup water

6 tablespoons unsalted butter

1 teaspoon salt

1 teaspoon vanilla

2 & 1⁄4 cups flour

1 egg


FOR THE CINNAMON SUGAR

1 & 1/2 cups sugar

1-2 tablespoons cinnamon


FOR FRYING

Canola oil (or any neutral oil with a high smoking point for frying)


for the churros

  1. In a medium/large saucepan over med/high heat, melt together butter, water, salt & vanilla - bring to a boil.

  2. Slowly add the flour & stir vigorously with a wooden spoon until dough comes together & is smooth.

  3. Transfer dough to a clean bowl, and let cool for a few minutes before adding thee egg. WERK UR BICEPS HUNTY! If you don’t - you’ll just scramble the egg.

  4. Transfer the dough to a piping bag fitted with a closed start tip & set aside


for the cinnamon sugar

  1. um….just mix your cinnamon & your sugar?

  2. probably in a shallow bowl so it’ll be easy to coat the churros later

  3. lol you didn’t need these instructions did you


for frying

  1. Using a dutch oven - heat about 2-3 inches of oil to 400 F

  2. Once temperature has been reached - pipe 3 to 5 inchs of dough over the oil - and cut.

  3. Fry them until lightly golden, flipping often so they get color on all sides.

  4. Remove from the oil with a slotted spoon or strainer - and place on a tray lined with paper towels to drain excess oil

  5. While the churros are still hot (but touchable) transfer them to the bowl of cinnamon sugar & coat

  6. Serve with chocolate sauce, dulce de leche or whatever else you like!


INSPIRED BY THIS RECIPE


watch the video
In bakemas
4 Comments

Sugar Cookies

December 8, 2018 Meghan Rienks
IMG_1117.jpg

for the cookies


1 cup butter (softened to room temperature)

1 cup caster sugar

1 egg

1 & 1/4 teaspoon vanilla extract

1/4 teaspoon almond extract

1 & 1/2 teaspoon baking powder

1/2 teaspoon salt

3 cups all purpose flour

1 tablespoon milk (if your dough is too dry)


IMG_1136.jpg
IMG_1138.jpg


for the royal icing


3 ¾ cup confectioners’ sugar

3 large egg whites

½ teaspoon cream of tartar

Pinch of salt

1/2 teaspoon vanilla

1/8 teaspoon almond extract

Water (if needed)

Adapted from NYT


IMG_1130.jpg
IMG_1131.jpg

for the cookies:

  1. In a stand mixer fitted with a whisk attachment (or with a handheld electric mixer) - cream together butter & sugar until light and fluffy (5-7 minutes)

  2. Once creamed, add in the egg, beat again, then vanilla & almond extract, and beat again.

  3. In a medium bowl whisk together flour, salt & baking powder. With the mixer on low, gradually add the dry into the wet until just combined.

  4. Transfer the dough to a baking try lined with a silicone baking sheet or parchment paper.

  5. With the dough sandwiched between the silicone mat & parchment paper (or parchment paper & parchment paper) - gently roll the dough out to about 1/4 inch thick

  6. Transfer the tray of rolled dough to the fridge for about an hour to chill.

  7. Once the dough is chilled- take it out and begin to cut it into shapes. Re-roll the scraps as needed.

  8. Put the cut out dough back into the fridge to chill again (another 30 min- 1 hour depending on how soft it got)

  9. Pre-heat oven to 350 degrees F

  10. Once chilled, transfer straight from the fridge to the oven and bake for 8-10 minutes, until the sides of the cookies begin to take a bit of color, but not much.

  11. Cool on a the baking sheet until they’re set enough to transfer to a rack to finish

for the royal icing:

  1. In a large bowl with an electric mixer beat all the ingredients except the powdered sugar together.

  2. Once well combined - add the powdered sugar a bit at a time, until desired consistency is achieved.

assembly:

  1. Frost yo damn cookies!

  2. Let them set overnight (I know) to ensure that the icing hardens


In bakemas
4 Comments

Baked Alaska

December 7, 2018 Meghan Rienks
IMG_0770.jpg IMG_0771.jpg IMG_0174.jpg IMG_0165.jpg IMG_0176.jpg

for the ice cream

3 flavors (or 1, or 2, or 6 - idk)


for the brownie

3/4 cup of butter

1 & 1/2 cups caster sugar

3/4 cup cocoa

3 eggs

1 tsp vanilla

1 tsp salt

1 tsp espresso powder

3/4 cup of flour

1 cup chocolate chips


for the meringue

3 egg whites

200g caster sugar

1/4 teaspoon cream of tartar


IMG_0774-2.jpg
IMG_0788.jpg

brownie

  1.  Pre-heat oven to 350F & prepare a 9in round pan

  2. In a saucepan over med/low heat, melt the butter. Once melted, pour it into a bowl with the white sugar & stir

  3. Mix in the cocoa, then add the eggs one at a time until fully incorporated

  4. Stir in vanilla, salt & espresso powder until smooth.

  5. Gently fold in the flour about 1/3 at a time, until just combined.

  6. Stir in the chocolate chips & then pour into prepared pan.

  7. Bake for about 20-25 minutes or until they start to pull away from the tin.

  8. Cool


meringue

  1. In a large clean bowl of a stand mixer (or using a handheld mixer) whip the egg whites until stiff peaks form.

  2. Add the sugar in thirds, whisking well each time you add more.

  3. Whisk until it’s glossy and forms very stiff peaks.

assembly

  1. Grease a large glass bowl with canola oil & line with saran wrap (making sure there’s enough to go over the edges)

  2. Scoop the ice cream(s) into the bowl until almost filled the whole way - then using another piece of saran wrap, place it on the top & gently press the ice cream with the palm of your hand, until flat.

  3. Cover with additional saran wrap and place in the freezer for at least 4 hours (ideally overnight)

  4. Once fully frozen, take out of the freezer and place brownie on top of the ice cream & press firmly.

  5. Re-wrap in saran wrap and place in the freezer for another hour+ to adhere the brownie to the ice cream.

  6. When ready - WORK WITH SPEED BRO!

  7. Turn the bowl out onto your cake stand or serving platter

  8. Coat with meringue, work FAST but make sure you don’t leave any ice cream exposed.

  9. When fully coated - TORCH BABY TORCH!

  10. Start on a low flame so you

    • a.) don’t burn your house down

    • b.) burn your baked alaska

  11. Once golden brown - cut & SERVE!


IMG_0166.jpg
IMG_0175.jpg
IMG_0165.jpg
IMG_0176.jpg

Inspired by this recipe


In bakemas
Comment

Black Forrest Gâteau

December 6, 2018 Meghan Rienks
IMG_0594.jpg IMG_0587.jpg IMG_0602.jpg IMG_0601.jpg

For the SPONGE


225g all purpose flour

350g caster sugar

85g cocoa powder

1½ tsp baking powder

1½ tsp baking soda

2 eggs

250ml milk

125m vegetable oil

2 tbsp boiling water


For the jam


850g frozen pitted dark cherries

300g caster sugar

juice from 1 lemon

4 tbsp cornstarch


for the ganache


200g dark chocolate (chopped)

200ml heavy cream


for stabilized cream


500 g mascarpone cheese

6-8 tablespoons confectioners sugar

⅔ cup + 3 tablespoons heavy cream

1 tsp vanilla extract


IMG_0619.jpg
IMG_0632.jpg

for the sponge

  1. Preheat the oven to 180C

  2. Prepare three 6in cake tins with baking spray & parchment paper

  3. In a medium bowl whisk together dry ingredients (flour, sugar, cocoa powder, baking soda & baking powder)

  4. In a large bowl, using an handheld mixer (or a whisk), mix the wet ingredients (eggs, milk & vegetable oil)

  5. Pour the dry into the wet & mix until just combined. Add the boiling water & beat again until smooth.

  6. Divide the batter equally between the tins & bake for 25-30 minutes or until a toothpick comes out clean.

  7. Cool the cakes for 10 minutes in their tin, then turn them out to cool completely on a wire rack.

  8. When the cakes are fully cooled, level them & set aside.

for the jam

  1. Place cherries, sugar & lemon juice into a in a saucepan over medium/low heat until sugar dissolves.

  2. Take off the heat & strain the cherries, reserving their liquid.

  3. Measure 4 tablespoons of the liquid, place into a bowl & mix in the cornflour

  4. In a mug or a mason jar - set aside another 4-5 tablespoons of the liquid for brushing over the cakes

  5. Add the cherries back to the sauce pan & pour the rest of the strained liquid back into the saucepan

  6. Stir the cornflour slurry into the saucepan with the cherries, bring to a boil, stirring constantly until thick.

  7. Pour the jam into a shallow bowl and transfer to the fridge to cool completely.


for stabilized cream

  1. In a chilled bowl, using an electric mixer, beat the mascarpone, cream, vanilla & whip until it begins to thicken.

  2. Add the powdered sugar a few tablespoons at a time, until desired sweetness level is achieved.

for the ganache

  1. Place the chopped chocolate into a heatproof bowl- set aside

  2. Heat the heavy cream in a saucepan until it begins to bubble slightly - but before it boils & scalds

  3. Once the cream is heated- pour it over the chocolate and let stand for 1-2 minutes

  4. Stir the chocolate and cream until combined.

  5. Set aside to cool - we want this to be THICK so it will take a while (*you could place it in the fridge - but if you do, make sure to stir it every 5 minutes)

assembly

  1. On a cake stand (or whatever you’re serving it on) place down the first and ugliest cake layer.

  2. Brush it with the reserved cherry juice, then spread a thick layer of mascarpone cream.

  3. Add some of the cherries on top, gently pushing them into the cream until they form a full layer.

  4. Gently place the second (and second ugliest) cake layer on top & repeat the process.

  5. Add the last, and prettiest cake layer to the top - spread a thick layer of ganache & pile high with fresh fruit

  6. Dust with icing sugar & serve! (if you find it too soft - let it set up in the fridge for a few minutes before cutting)


IMG_0602.jpg

notes

while this sponge is traditional my taste testers commented on it’s lack of depth compared to other chocolate cakes I’ve made - so if you’re looking for something a bit richer - I’d try it with a this recipe

I most certainly made too many cherries as my cake was only 6in, it would make enough for an 8in cake

If you’re serving it immediately or if you’re opting for less/thinner cake layers you could use a whipped cream, but otherwise I think a stabilized cream (with mascarpone or cream cheese) would hold up better.

THIS CAKE DOES NOT KEEP WELL. Like at alllllll. Anything with cream, fruit (fresh or frozen) should be eaten same day -8 hours after & what was left of this cake had slid to mush.


INSPIRED BY THIS RECIPE & THIS RECIPE


WATCH THE VIDEO
In bakemas Tags bakemas, cake, chocolate, fruit
1 Comment
Older Posts →